CND™ PLEXIGEL ART - By Fee Wallace
15th Apr 2024
Technique #1 – Encapsulated Nail Art with CND™ PLEXIGEL

We know that CND™ PLEXIGEL Shaper and Clear Builder have beautiful clarity. This makes them an excellent medium for encapsulating nail art embellishments. Glitter, foil, iridescent flakes – they all look incredible suspended within a crystal-clear CND™ PLEXIGEL enhancement. Most of the time, nail artists decorate the outside of the nail enhancement, but encasing the design inside the nail enhancement allows us to create greater dimension and a sleeker finish.
YOU WILL NEED:
For inspiration and proper perfect protocol from CND™ for encapsulated nail art with PLEXIGEL, check out this beautiful nail art guide containing five individual encapsulated PLEXIGEL step by steps.
Technique #2 – French Ombre / Baby Boomer

The French Ombre is a solid classic. A nail design technique that comes back again and again. Traditional French manicures have a defined ‘smile line’, a sharp curved line where the pink meets the white, but in a French ombre this line is blended to create a gradient from white at the tip, to pink at the cuticle line. CND™ PLEXIGEL Color Builder is a superb option for easy to wear and natural looking French ombres.
WHAT YOU WILL NEED:
1. P.R.E.P. the natural nail and fit a CND™ Future Form or a CND™ Clear Stiletto Tip blended and filed to the desired length and shape. (Visit cnd.com for complete CND™ PLEXIGEL Application Step by Step). Apply a thin layer of PLEXIGEL Bonder and cure using button (1) in the CND™ LED Lamp.
2. Apply a thin layer of CND™ PLEXIGEL Shaper to the nail and cure using button (2B) on the CND™ LED Lamp.
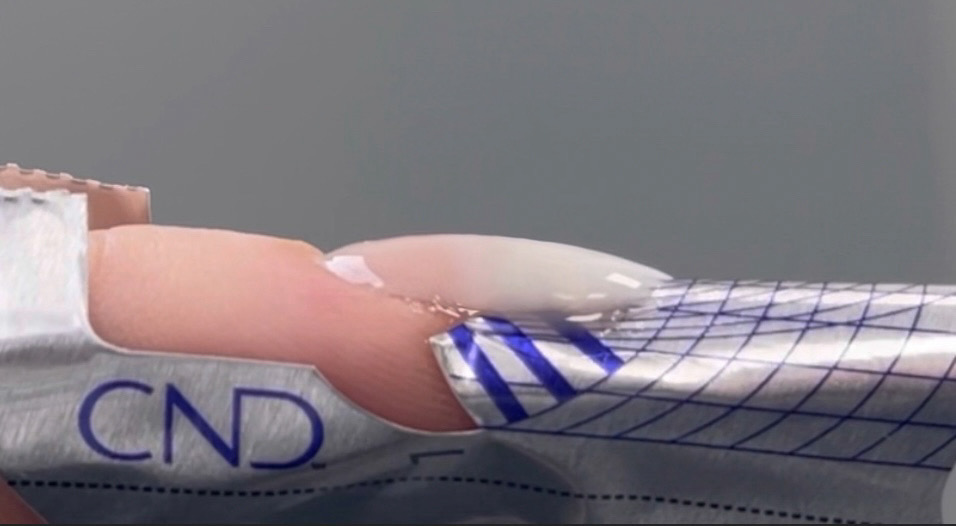
3. With the CND™ PLEXIGEL Color Builder of your choice, build the ‘nail bed’ part of the nail as shown below. Once you are happy, cure in the CND™ LED Lamp using button (2B).
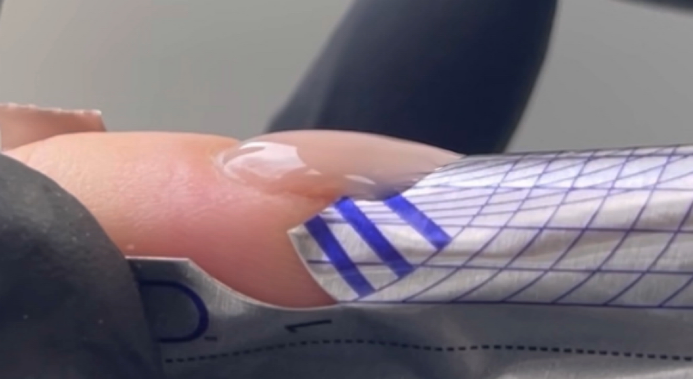
4. Apply CND™ PLEXIGEL Builder in PORCELINE to create the extension edge of the nail. This will lie on top of the previous Color Builder overlapping, creating the appearance of the fade from one colour to the other. Cure for one minute using button (2B).
5. Wipe with 99% Isopropyl Alcohol to remove top film. Refine the shape of the nail using a 180-grit file and cleanse the nail with 99% Isopropyl Alcohol.
6. Apply one thin layer of your chosen base Colour Builder to soften and disuse the ombre, then cure for one minute using button (2B).
7. Apply CND™ PLEXIGEL Protector Top Coat. Cure for one minute using button (3).
8. Wipe with 99% Isopropyl Alcohol to remove top film and finish with CND™ SolarOil.
In my next feature here on the Sweet Squared Blog, I’ll be creating Bridal and Clean Girl Manicure styles using CND™ PLEXIGEL. This French Ombre / Baby Boomer will be a beautiful base on which to apply stunningly subtle, refined Bridal Nail Art looks.
Join us LIVE on Tuesday April 28th at 1pm to see everything in action, ask questions and join in with our Tune in Tuesday community. You can register HERE to watch live and get access to the recording. Hope to see you then!
Technique #3 – Mixing CND Shellac into CND PLEXIGEL
It’s a bit of a well-kept secret that we can in fact MIX drops of CND™ Shellac™ colour into CND™ PLEXIGEL in order to create custom colours or other artistic effects. This opens up a whole world of possibilities for nail art designs and bespoke colour combos. CND™’s research chemists have tested this technique rigorously in the lab, so we know for sure that’s it’s safe and doesn’t compromise the performance of our nail service, provided we adhere to the following rules:
-If your custom colour PLEXIGEL blend will be used to create the structure of the enhancement, we combine a MAXIMUM of 5% Shellac™ Colour to 95% PLEXIGEL. This an ideal technique if we want to alter the colour of a PLEXIGEL Color Builder to warm it up or cool it down, or add some shimmer or dimension to the nail enhancement. Remember, CND™ Shellac™ cures with ‘tiny tunnels’ to allow for butterfly removal. When mixed into CND™ PLEXIGEL over 5%, this could compromise the durability of the enhancement service.
-If the PLEXIGEL nail enhancement is already completed as normal, and we plan to simply decorate the surface of the enhancement, then we can add a lot more Shellac™ without compromising performance, mixed into PLEXIGEL Shaper, Builder, or Protector Top Coat.
How do we deal with this kind of nail art when it comes to the rebalance??
For most of my nail clients, I create and maintain their enhancements with Clear or a single PLEXIGEL Color Builder. This allows me to create nail designs and art as a thin decorative layer ON TOP of the finished enhancement. In practice this is the easiest way to efficient, straightforward rebalance services. We simply remove the decorative colour layer, rebalance the enhancement, then decorate again. HOWEVER, if we choose to create nail designs that are BUILT IN to the structure of the nail enhancement, as we have here in this blog, what do we do when it comes time to rebalance??
The idea of completely removing the full set of nails each time and starting from scratch fills me with horror. From the perspective of performing an efficient service in a timely fashion that cares for the natural nail, complete removal and replacement of hard gel nail enhancements every time is unthinkable. So for my clients who enjoy wearing encapsulated nail designs, I generally stick to the following cycle:
-Full Set with Encapsulated Nail Art
-1st Rebalance: add a new element to the design at the cuticle line, incorporating the existing encapsulated elements.
-2nd Rebalance – Rebalance enhancements with Clear and decorate at the end with a solid colour coating.
-3rd Rebalance – Again, Rebalance with clear and decorate with opaque colour.
-Partial removal and Full Set with Encapsulated Nail Art.
This plan will vary depending on the design, but my point here is that we should, as responsible professionals, be removing only what is absolutely necessary during a rebalance in order to minimise trauma to the natural nail over time.
Join me again for another blog next week!
Fee xxx
https://www.facebook.com/fee.wallace
https://www.instagram.com/fee_wallace
https://www.tiktok.com/@fee_wallace