PLEXIGEL MONTH Blog - PLEXIGEL Pro! - With Sarah Marr
13th Jun 2025
Tuesday, 2nd June, saw the launch of CND™ PLEXIGEL month 2.0. After the success of last year’s campaign, we have brought it back bigger and better than before. Not only do we have some incredible offers for customers who are new to the wonders of CND™ PLEXIGEL, but this year, we also have two offers available to existing customers.
I kicked off PLEXIGEL month with a Tune in Tuesday showcasing some PLEXIGEL nail art. As a builder gel option, we have both shaper and builder in the line, both of which can be used for encapsulation and can be mixed with SHELLAC™ Vivid.
PLEXIGEL is a versatile option for clients needing a little more strength and durability. With nail art becoming an ever-popular request, let's take a look at what can be achieved.
Let's start by looking at jelly colors. SHELLAC™ Vivid is fantastic for mixing with PLEXIGEL shaper for an easy, sheer jelly color look. Vivid can be mixed into PLEXIGEL at a rate of 5-10%; any more than this will result in tiny tunnels being created in the PLEXIGEL during curing, which will ultimately cause brittleness in the product so it is important to stick to the correct ratios.

This image shows the Vivid color as it looks straight from the bottle, and beside it the Shaper 'jelly' mix.
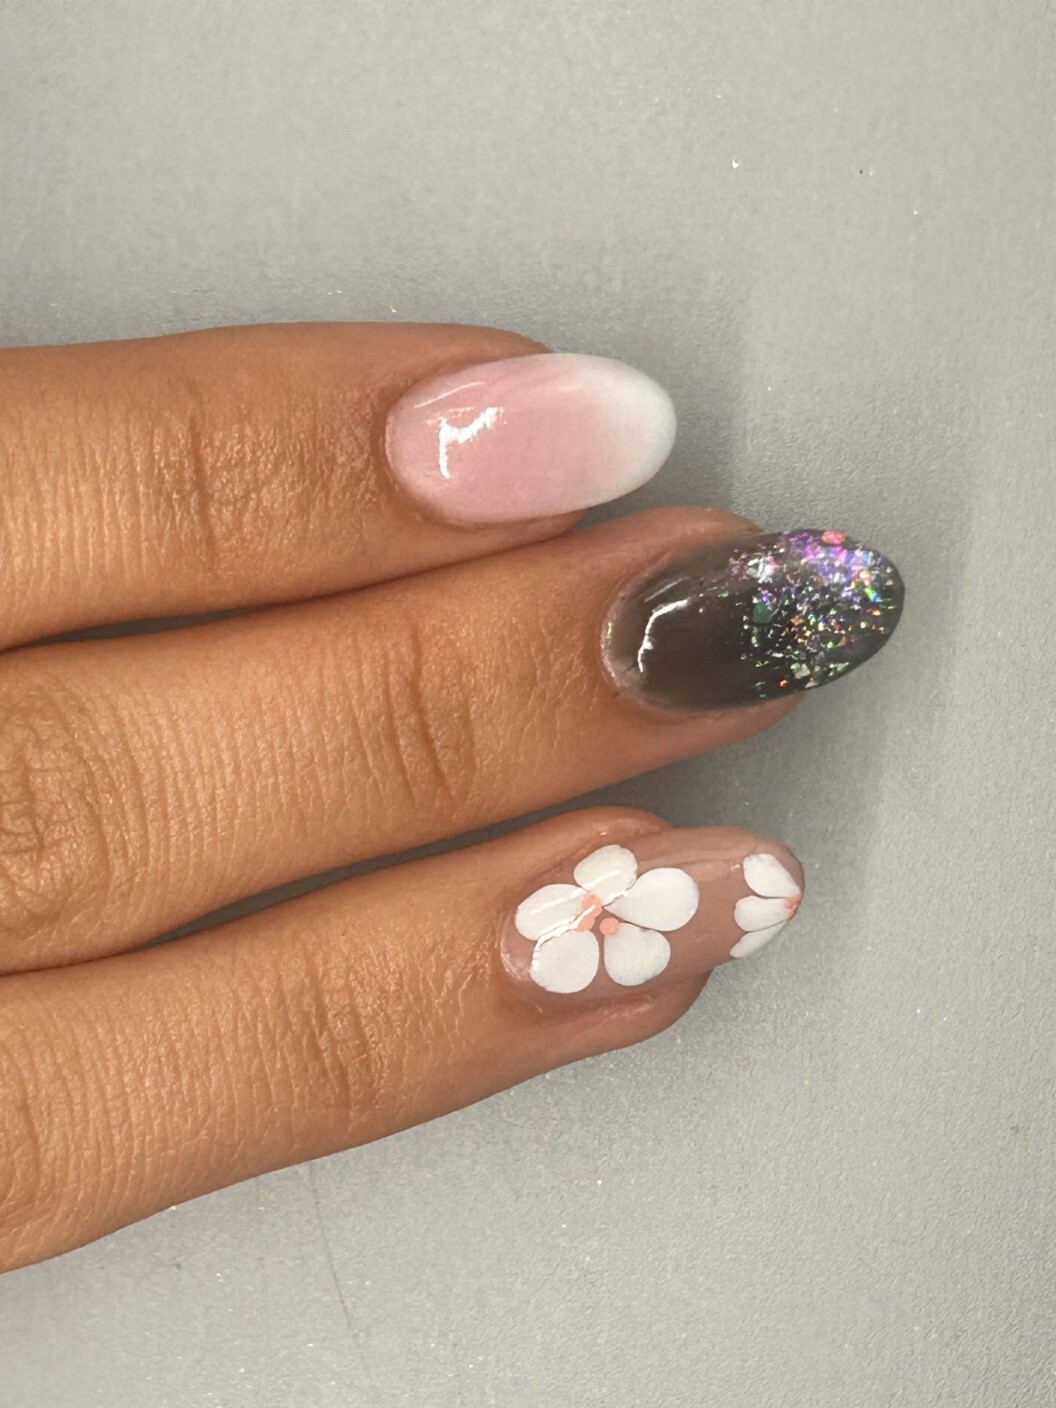
Next, we incorporated some glitter into the jelly mix. We created our jelly color using Black Tuxedo SHELLAC™ Vivid into PLEXIGEL shaper, applied it to the nail, and once cured in our CND™ LED Lamp, I used Lecente Purple Silver metallic flakes to add a glitter fade directly onto the inhibition layer of my gel. This is a really quick but effective look for clients who want something a little different but want to cover the natural smile line.
Possibly the most common question I get asked as an educator is how to do a French ombre or a “baby boomer” nail, and PLEXIGEL is a fantastic medium for creating a flawless blend for an ombre. I started by creating a custom pink using Cool Berry and Cream Puff color builders. I then added Cream Puff Plexigel to the tip of my nail and feathered it down towards the apex of the nail. After curing I applied more cream puff builder to create opacity on the tip of the nail and feathered it towards the center again but this time not curing it, to create my ombre I then added my custom blend to the cuticle line and began to apply it, using a gentle side sweeping motion as I met my white in the middle. The wonderful thing about plexigel is you can play around with it as long as you need to until you are happy with your blend. If you need to refine the surface of the nail, then I recommend using a layer of Clearly Pink builder to protect your blend from the file. There is nothing more annoying than doing the perfect ombre and then filing in a blank spot into it, trying to perfect the shape. Clearly pink works well as not only does it protect the ombre, but it also works to further soften the blend between the two colors. You could also use a clear builder. Finish with PLEXIGEL Protector top coat.

While creating the content for this live, I was thrilled to discover that PLEXIGEL top coat works really well as a blooming gel, so of course I needed to do some looks utilising this. First up was a polka dot bloomed look which also incorporated a jelly colour. I mixed SHELLAC™ Vivid Red Carpet with PLEXIGEL Shaper to create my sheer red base. I topped it with PLEXIGEL Protector Top Coat, and before curing, I dropped in dots of Lazuli Blue, Shamrock Green, Yellow Taxi, and Red Carpet SHELLAC™ Vivid. Once all my dots were in place, I cured them and then finished the nail with PLEXIGEL Protector Top Coat.

Then we looked at mixing PLEXIGEL color builders to create custom shades. this is a fantastic way to create bespoke colors specifically designed for the clients’ skin tone. There are 10 colored builders in the range, as well as clear.
I mixed milky mauve and cream puff colored builder to create a beautiful warm nude, then added a little drop of SHELLAC Vivid in Blush Pink to lighten it. I applied it to the surface of the nail, creating my structure. I then used PLEXIGEL Protector top coat as my blooming gel, and while still wet, I dropped petals of Vivid White Gloves to create a large flower on the nail. Once cured, I added dots of Blush Pink Vivid to the center of the flowers, cured, and finished the look with a final layer of Plexigel top coat.
Our final look incorporated a custom plexigel and vivid mix, stamping, chrome, and blooming gel! I went all out to highlight the versatility and ease of the products working together without needing loads of steps, extra buffing, or 5 layers of top coat to achieve a look that looks more complicated than it actually is. I created my custom mix using Barre Beauty and Red Carpet Vivid to create a Rosebud pink for the overlay. Once applied to the nail, cured, and refined, if necessary, I wiped off any dust with isopropyl alcohol and then prepared my stamping tools. I used the Yours Stamping plate called “Frame of Mind”, and I stamped the frames using Black Tuxedo Vivid. Vivid is incredible for stamping as it is so highly pigmented, it gives really crisp and defined lines even on the most detailed of plates. I placed the stamp towards the end of the nail, cured on button S2 in the CND™ LED lamp, and then rubbed gold chrome directly onto my stamped frame. Chrome adheres so well to vivid and doesn’t require the use of a no-wipe top coat. To finish the picture inside the frame, I coated the nail with a layer of PLEXIGEL protector top coat, dropped in Vivid White gloves to create a mini image of the large flowers we created earlier in the session. Yellow Taxi Vivid was used for the center part of my flowers. After curing on button 3, I re-top coated to finish the look.

If you create the butter nails trend, don’t forget to tag us at @sweetsquared.nails on Instagram!