STAMPING SURGERY
Posted by Fee Wallace on 15th Dec 2021
Stamping is one of my most favourite ways to create nail art. If you have tried it you’ll know that when it goes right, it’s great, but if it’s not working out, it can be incredibly frustrating. Since my very first video tutorial, I’ve been helping Nail Pros troubleshoot their stamping process. Recently we hosted a live Stamping Surgery masterclass on Sweet Squared’s amazing education platform, Academy2. We ran through the basics, the common troubleshooting we come across, and showed some more advanced stamping techniques step-by-step. In this blog I’ll take you through my 3 core stamping techniques which I use day to day, plus the common troubleshooting issues we come across. Look out for my next stamping blog, where we will go into some very cool advanced stamping techniques, with advice and tips on how to execute them beautifully.
Today, let’s start with the basics. Nail art stamping is the process of using polish in a small metal plate, laser-cut with a pattern or design, picking up that design on soft silicone stamper, and transferring it to the nail. Stamping allows us to decorate nails with speed and ease, creating looks in a matter of minutes that would otherwise take much longer to paint by hand. I love the precision and sharpness we can achieve using a stamp, and the process is easy to integrate with other nail art techniques.

Stamping with Stamping Polish
In my opinion, the simplest way for a Nail Professional to utilise the stamping technique, is to stamp with air drying stamping polish, onto cured gel polish, before finishing with gel polish top coat. One could, in theory, stamp with any air drying polish, but I have found my best results using :YOURS Stamping Polish applied to the sticky top film of a cured CND™ Shellac™ colour layer.
There are a lot of different stamping tools and products out there, it can get confusing. Here I will stick to the specific products I love to use day to day, using brand specific items I know I get best results from consistently. If you are using a different brand of stamper, gel polish or stamping polish, you can still get excellent results, but you may need to tweak the process as I describe it here.
Step 1
Clean the stamping plate with CND™ ScrubFresh™ and a lint free gauze pad, and clean the :YOURS Halo Stamper using a lint roller.
Step 2
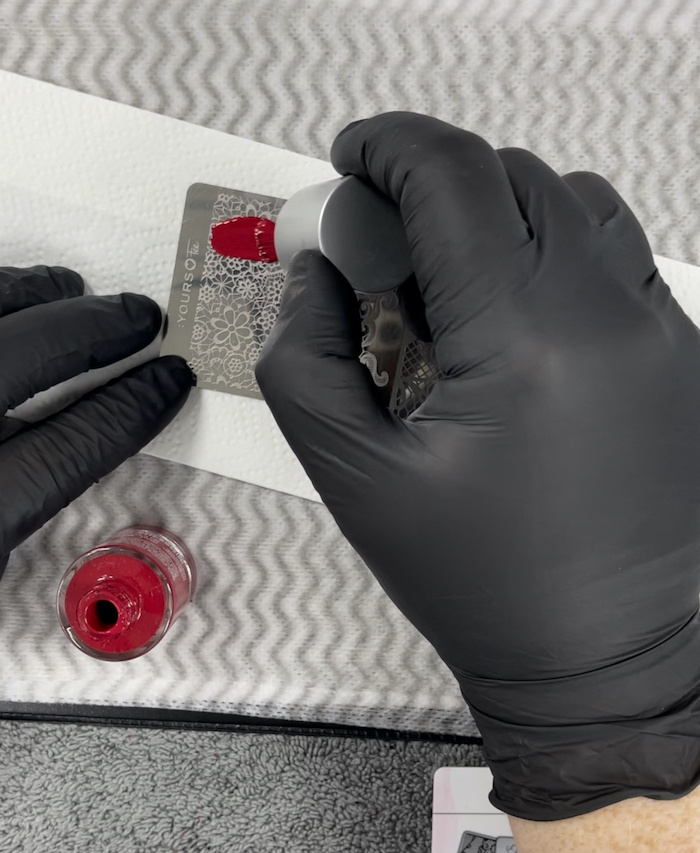
Shake your stamping polish and apply a blob to the stamping plate.
Step 3
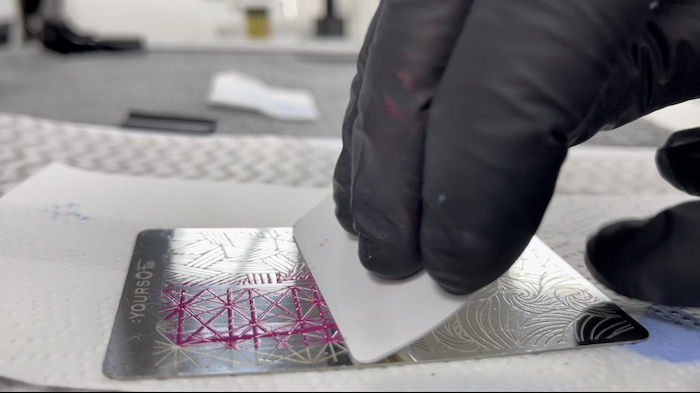
With a Scraper Card, scrape once, firmly, to spread the polish into the cut out grooves in the stamping plate.
Step 4
Now immediately roll the :YOURS Halo Stamper over the plate to pick up the design using gentle pressure.
Step 5
Transfer the design to the cured Shellac™ colour layer first by lining up the design where you want it to land, then pressing the :YOURS Halo Stamper down onto the nail surface.
Step 6
You can now go on to add pigment, foil or glitter, or simply finish with the CND™ Shellac™ Top Coat of your choice.
I like to use CND™ ScrubFresh™ to clean my stamping plate because it removes old stamping polish quickly and cleanly, even if it’s been on there for a while. The plate is left sparkling clean and dry. You can use pure acetone to clean the plate, but I find that can often leave a cloudy residue. My favourite pads to use along with CND™ ScrubFresh™ for this task are Mundo Gauze Pads.
It is not recommended to clean the :YOURS Halo Stamper with CND™ ScrubFresh™, or any solvents at all. Doing so will break down the silicone and damage your stamper. A lint roller (a sticky cylindrical device with a handle used for cleaning hair and fluff off of clothing and furniture) is ideal for cleaning the :YOURS Halo Stamper, but you could also use sticky tape or sticky labels.
Stamping with Pigment Powder
This method of stamping is ideal for beginners and experienced stampers alike. The main difference from stamping with air drying stamping polish, is that there is no time pressure, as the pigment powder isn’t drying in the plate. Being able to take your time a bit, can make the whole process go more smoothly, especially when starting out.
You will notice the end result looks a bit softer and more diffused when compared to stamping with polish. We can create some really beautiful effects, especially with shimmering pearl powders, but the design will appear softer when using this method.
Step 1
Clean the stamping plate with CND™ ScrubFresh™ and a lint free gauze pad, and clean the :YOURS Halo Stamper using a lint roller.
Step 2
Use a brush to pick up pigment powder and press it on to the stamping plate.
Step 3
With a scraper card, scrape across the surface of the plate. Take your time and make sure the powder is packed in to the cut out grooves of the design. Scraping multiple times in different directions will help to achieve this.
Step 4
Now roll the :YOURS Halo Stamper over the plate to pick up the design using gentle pressure.
Step 5
Transfer the design to the cured Shellac™ colour layer first by lining up the design where you want it to land, then pressing the :YOURS Halo Stamper down onto the nail surface. The dry pigment powder will adhere beautifully to the cured Shellac™ colour layer.
Step 6
You can now go on to add other elements to the design, or simply finish with the CND™ Shellac™ Top Coat of your choice.

Stamping with Shellac™
Generally, I recommend not stamping with gel polish, unless there is a specific reason to. Stamping with air drying polish is more straightforward and less time consuming if you are just looking for a solid colour. However, if you need your stamped on pattern to be sticky (to allow you to adhere glitter, foil or pigment to the pattern only for example), then stamping with CND™ Shellac™ is worth the extra effort.
Remember that unlike stamping polish, Shellac™ will not dry in the plate, but we do want some of the solvents to evaporate before stamping on, so we can take our time when scraping, and scrape multiple times with the scraper card.
Step 1
Ensure the nail surface is prepared correctly. The colour on the nail should be finished through to top coat and have the sticky top film removed from the cured top coat with IPA. Sometimes I like to go over the cured top coat layer with the green side of a CND™ Glossing Buffer, just to make sure the surface has absolutely no sticky on it whatsoever.
Step 2
Clean the stamping plate with CND™ ScrubFresh™ and a lint free gauze pad, and clean the :YOURS Halo Stamper using a lint roller.
Step 3
Brush on a blob of CND™ Shellac™ to your chosen stamping plate.
Step 4
With the scraper card, scrape to spread the Shellac™ colour across the design. Now scrape again, from the opposite direction. Scraping multiple times will help to pack the Shellac™ into the grooves of the plate’s design, and also allow some solvents to evaporate, giving us a slightly stickier consistency ideal to stamp with.
Step 5
Now roll the :YOURS Halo Stamper over the plate to pick up the design using gentle pressure.
Step 6
Transfer the design to the dry, non-sticky nail surface by pressing the :YOURS Halo stamper down where you want your design to land.
Step 7
Cure the stamped on design as you would normally cure a Shellac™ colour layer.
Step 8
Adhere foil, glitter or pigment to the sticky design on the nail, and finish with the Shellac™ Top Coat of your choice. I favour Shellac XPress5 Top Coat for this technique because as the thinnest of all the Shellac™ top coats, it is the best choice when multiple layers are required.
It is important to mention that uncured gel polish should not be coming into contact with your clients skin. When we stamp with air drying polish, it poses no problem as by the time we stamp, the polish is dry on the stamper and will only adhere to the nail surface and not to the client’s surrounding skin. When stamping with gel polish, we must ensure that we do not overexpose our clients to a product that is not meant to contact with the skin in its uncured form. We can either mask off the client’s surrounding skin with micropores tape, some other barrier, or we can remove the overlapping parts of the design from the stamper with our lint roller before stamping the design onto the nail. One method will work better than another, depending on the density and position of the design. We must do whatever we can to prevent uncured gel polish getting onto the skin.

Stamping Troubleshooting
The most common troubleshooting questions I hear are, “why won’t the design pick up on the stamper?”, “why does the design come out patchy when I pick it up on the stamper?”, and “why can’t I get the stamper to pick up the clean sharp lines of the design?”
After years of watching others stamping in order to help work out what is going awry, we have identified the three main reasons why you could experience issues like this.
Point 1 – Brushing on the Stamping Polish
If when we apply the stamping polish to the plate, we take time to brush, brush, brush the polish on, as if we were painting the plate with polish, what will happen is that the polish will become too dry too quickly, and won’t lift easily from the plate when rolling the stamper over to pick up the design.
I recommend applying one blob/dollop of polish, and swiftly scrape over with your scraper card to fill the design with polish. Don’t brush it in there, scrape it in.
Point 2 – Too Much Scraping
When working with air drying stamping polish, the best plan is to scrape firmly ONCE only, then roll the stamper over to pick up the design. The temptation can be strong to scrape again, and again, especially if we observe what look like messy steaks of colour on the plate. We can find our selves thinking, ‘oh, I didn’t do that scrape very well, I better do it again..’ The problem is that multiple scraping accelerates the drying of the polish in the plate, so the design won’t lift out clean and sharp on the stamper. I have found, if I see those streaks on the plate after one firm scrape, 9 times out of 10 it will come out perfect and not be a problem. Multiple scrapes are not the solution, making sure your one firm scrape is deliberate and controlled should give you great results, don’t let those little streaks put you off, they almost never pick up with the design.
Point 3 – Too Much Pressure on the Stamper
This troubleshooting point is by far the most likely reason for the questions I described above. If your brushing is good and your scraping is good, and yet the design is still not picking up as you would expect, it’s likely you are pressing down on the :YOURS Halo Stamper when attempting to pick up the design. The :YOURS Halo Stamper should be rolled gently across the plate, if we exert downward force by leaning too heavily, the polish will remain in the plate and the stamper will come up with a result that is patchy at best. Experiment with applying as little pressure as possible while still making contact with the plate, you should find this makes a big difference.
Hopefully this has been helpful! I’d love to hear your experience with stamping - the good, the bad and the interesting! You can find me, Fee Wallace, across social media. The best place to start a discussion is over on Facebook, but you can also find photos and video content from me in the following places:
Fee on Facebook - https://www.facebook.com/fee.wallace
Fee on Instagram - https://www.instagram.com/fee_wallace
Fee on YouTube - https://www.youtube.com/feewallace
Fee on TikTok - https://www.tiktok.com/@fee_wallace
Fee’s own blog - https://feewallace.com/
If you enjoyed this blog, why not join me each Tuesday at 1pm for my weekly, interactive online show – Tune in Tuesdays. We broadcast on Sweet Squared’s amazing new education platform, Academy2. Find us there under ‘MasterClasses’. You can watch the show live, or get a link to a recorded version on catch up, and have access the notes and handouts I prepare each week to support the episodes. It’s free to take part, but you must register in advance, the recording is only available to those who register before the broadcasts commences.