CND PARTY READY CHRISTMAS NAIL ART STEP-BY-STEPS & WHAT TO CHARGE
Posted by Fee Wallace on 23rd Nov 2021
We Nail Professionals count down to Xmas by appointments… “Mrs Jones has two appointments left before her Xmas, Karen’s next appointment will be her Xmas nails, Mrs Smith won’t be coming till just before her New Year party…” We know we have to plan in advance and be prepared, so we have enough time to squeeze in a little nail art, and so we have the ideas and product ready and waiting. I have found that even the clients who normally prefer just a simple colour, will be more likely to choose something fun and different for their festive manicure. A Christmas dress is one thing, but your Christmas NAILS are an even bigger deal, am I right??
In my salon we used to book in our client’s festive appointments sometimes as much as a year in advance, so that it would never get to the last minute, and a regular client be stuck without a slot in the busy appointment book. If you have regulars, you will know that prioritising their festive appointments is extremely important.
For those clients who want to have some festive fun with their nails, we have so many options to fulfil their desires. But where to start? How to decide what to offer? I always recommend creating a few examples of the nail designs you feel confident creating, and having them out on pops for clients to see. It’s very easy for them and you to decide what they might have in advance, so you know what to expect on the day they come in for their Christmas appointment.

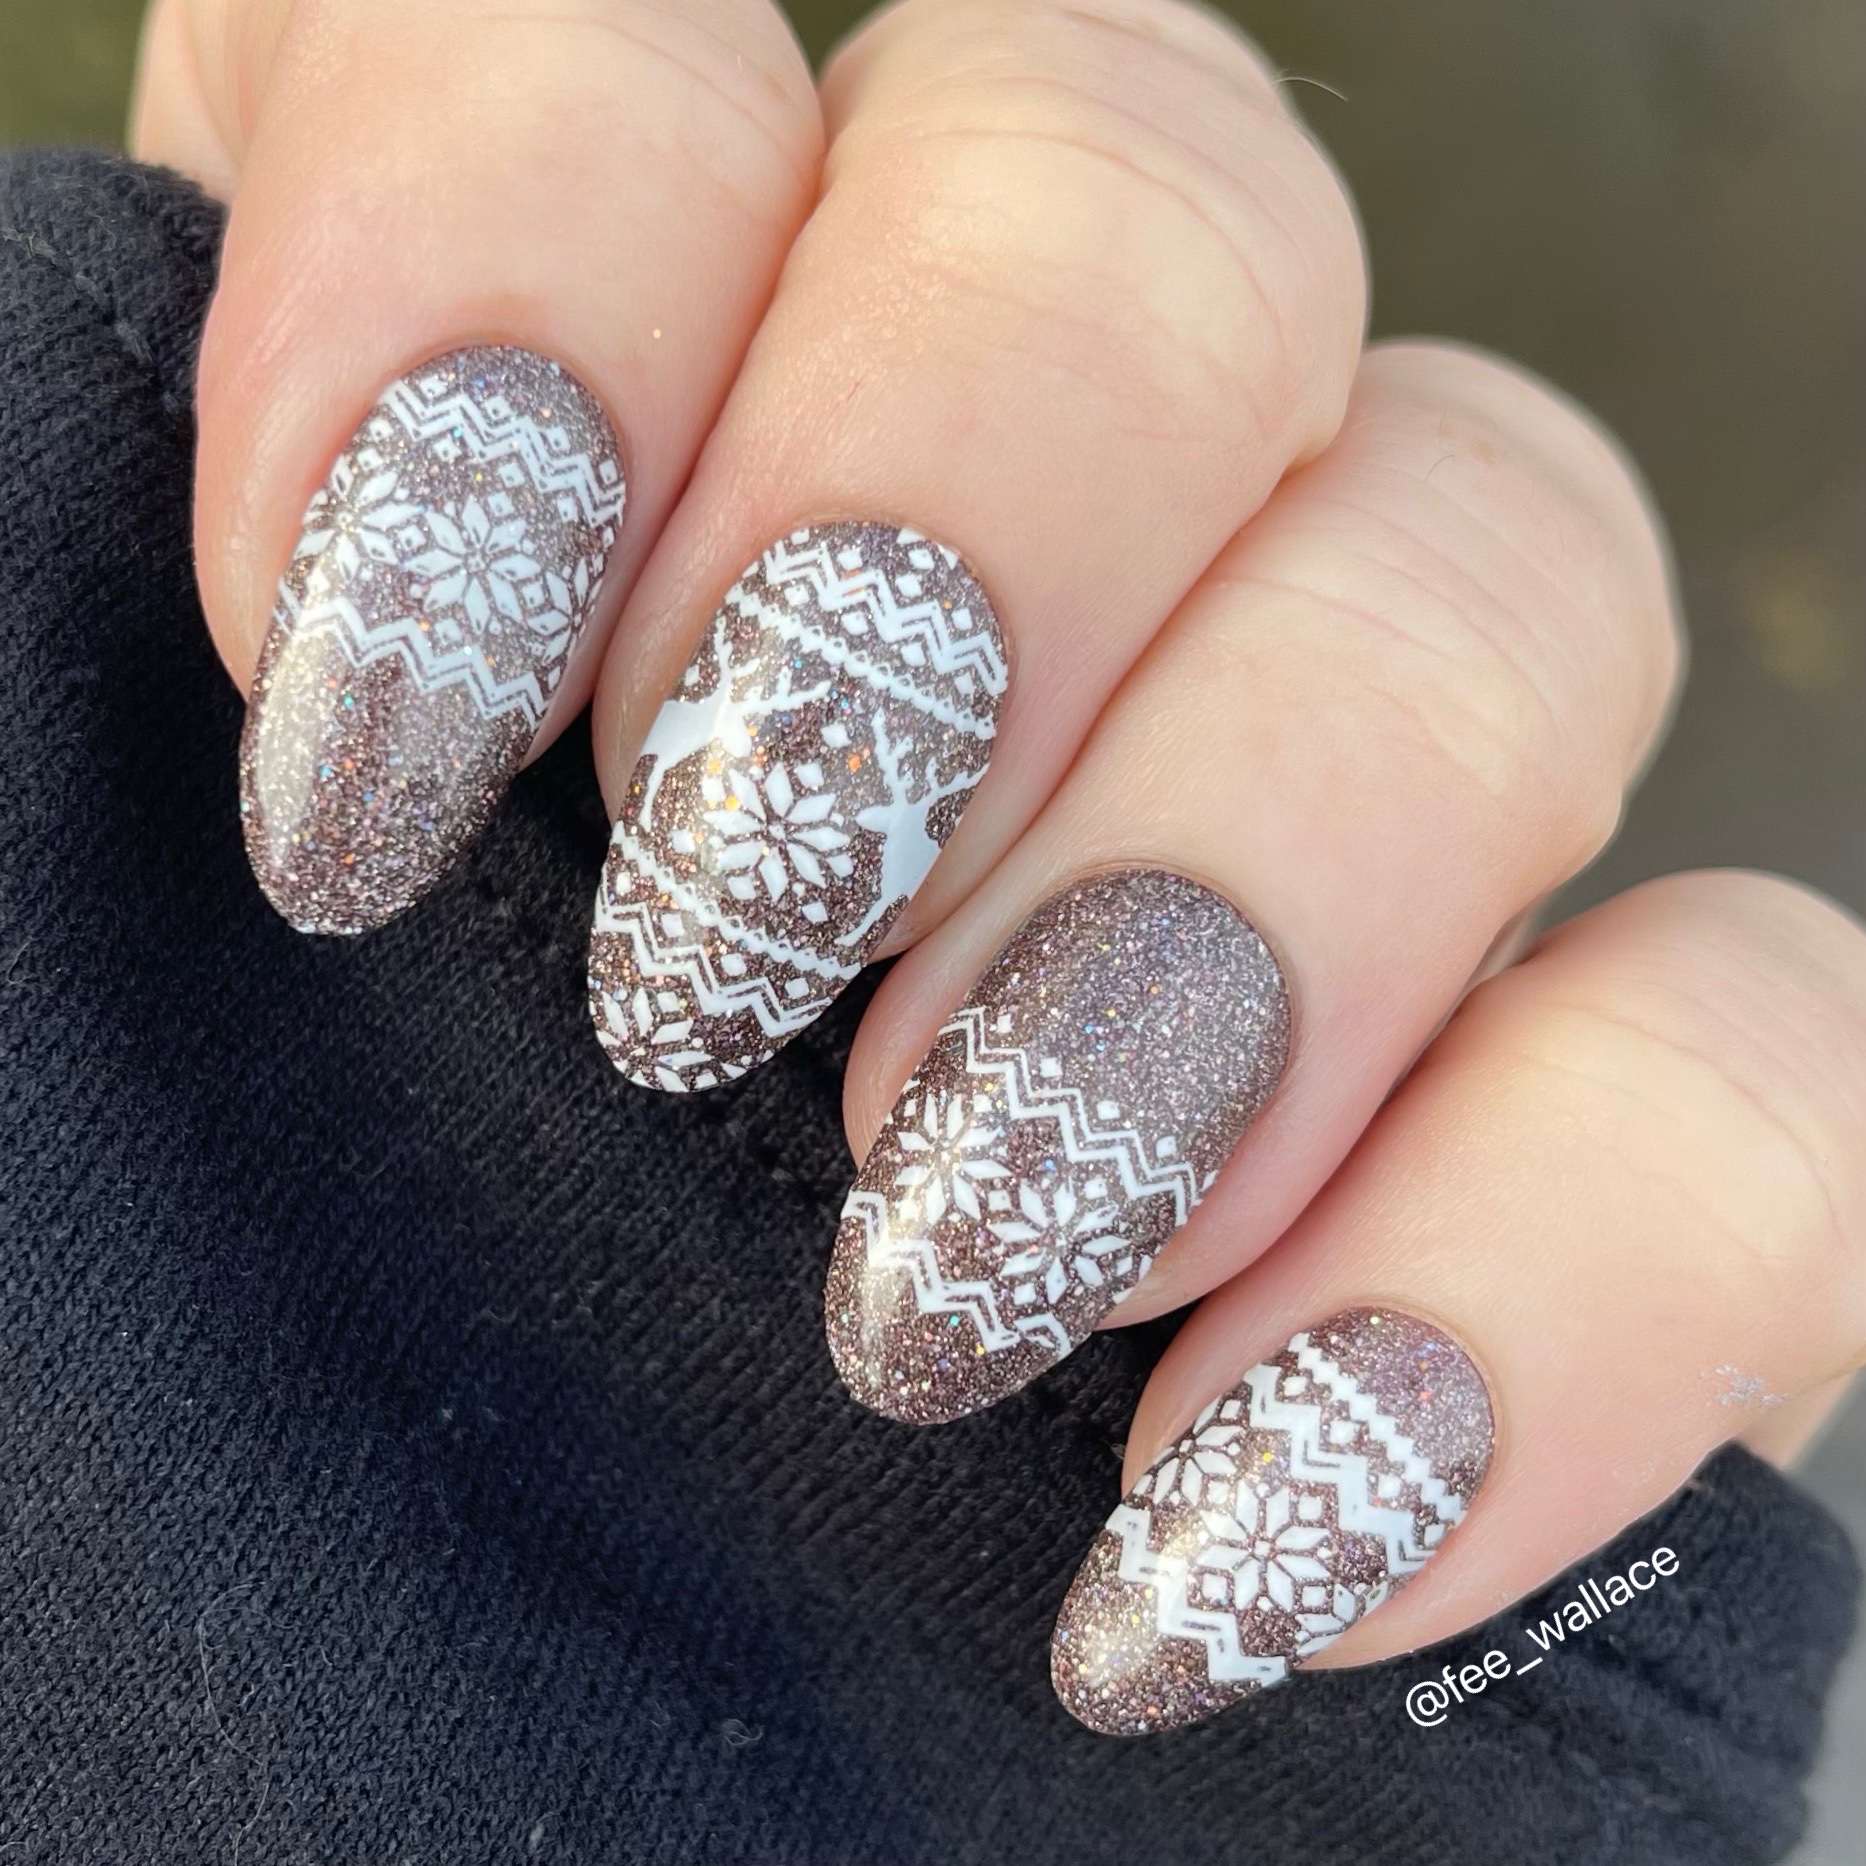
Let’s take a look at a simple, but very fun Xmas nail art style – The Xmas Jumper Print. You have probably seen the cute, 3D cable Knit nail art designs people create at this time of year. Those are a lot of fun, and if you would like a tutorial using CND™ Shellac™, you can check one out HERE. But, for a faster, simpler version, that results in a smooth sleek finish to the nail, I love to stamp!
This design looks cool over any colour. You can use just a little touch on one or two signature nails, or go the whole hog on all ten. It’s simple and looks fabulous. This design can be added to all ten nails as part of your regular gel polish service, adding no more than 10-15 minutes to your service time. I will talk a little more about how to charge later in the blog.
Step 1
After applying and curing your chosen base colour, you will be ready to stamp on your design using the :YOURS Loves Nataliya Winter Wonderland Stamping Plate.
Step 2
Clean the stamping plate thoroughly. I like to use CND™ ScrubFresh™, I find it gets the plate impeccably clean and dry.
Step 3
Brush on a blob of your chosen stamping polish to the stamping plate and immediately scrape once, firmly with your scraper card. Now gently roll the :YOURS Halo Stamper over the plate to pick up the design. It’s important that these 3 things are done in quick succession, otherwise you will find the stamping polish has dried in the plate and won’t pick up consistently. Once you have the design on the Halo stamper, you can put it down and take a breath, before moving on to step 4.
TIPS: I find white looks great over almost any colour for a XMAS jumper print. I recommend the :Yours Stamping Polish – White Light. You will notice I said to roll the Halo Stamper GENTLY across the plate. This is very important. If you press down heavily on the stamper while picking up the design, you will likely find patches of the design remain in the plate and don’t pick up properly.
Step 4
Apply the design to the nail by pressing the now dry stamping polish pattern onto the top film of the cured CND™ Shellac™ colour layer. You will find that it sticks beautifully. Not all gel polishes have the same sticky after curing, so if you are trying it with something else, you might need to tweak this process. But with CND™ Shellac™, it’s incredibly straightforward.
If you want to use just part of the design, use a lint roller or a piece of sticky tape to remove the parts of the design you don’t want to be there. I recommend using this method to clean your stamper when you are finished, and not to wipe it with solvents or cleansers which could damage the material.
Step 5
Finish the nail with the CND™ Shellac™ Top Coat of your choice, best suited to the needs of your client. For a natural nail Shellac manicure, I almost always choose XPRESS5™, as it gives the thinnest/sleekest finish, and removes easily in 5 minutes when the client returns.
Over nail enhancements I have decorated with Shellac and nail art, I love to use CND™ PLEXIGEL Protector Top Coat. This is a hard gel top coat designed to last beautifully for the duration of the enhancement service. But remember, PLEXIGEL Top Coat is NOT suitable to finish a regular natural nail Shellac™ Manicure service.

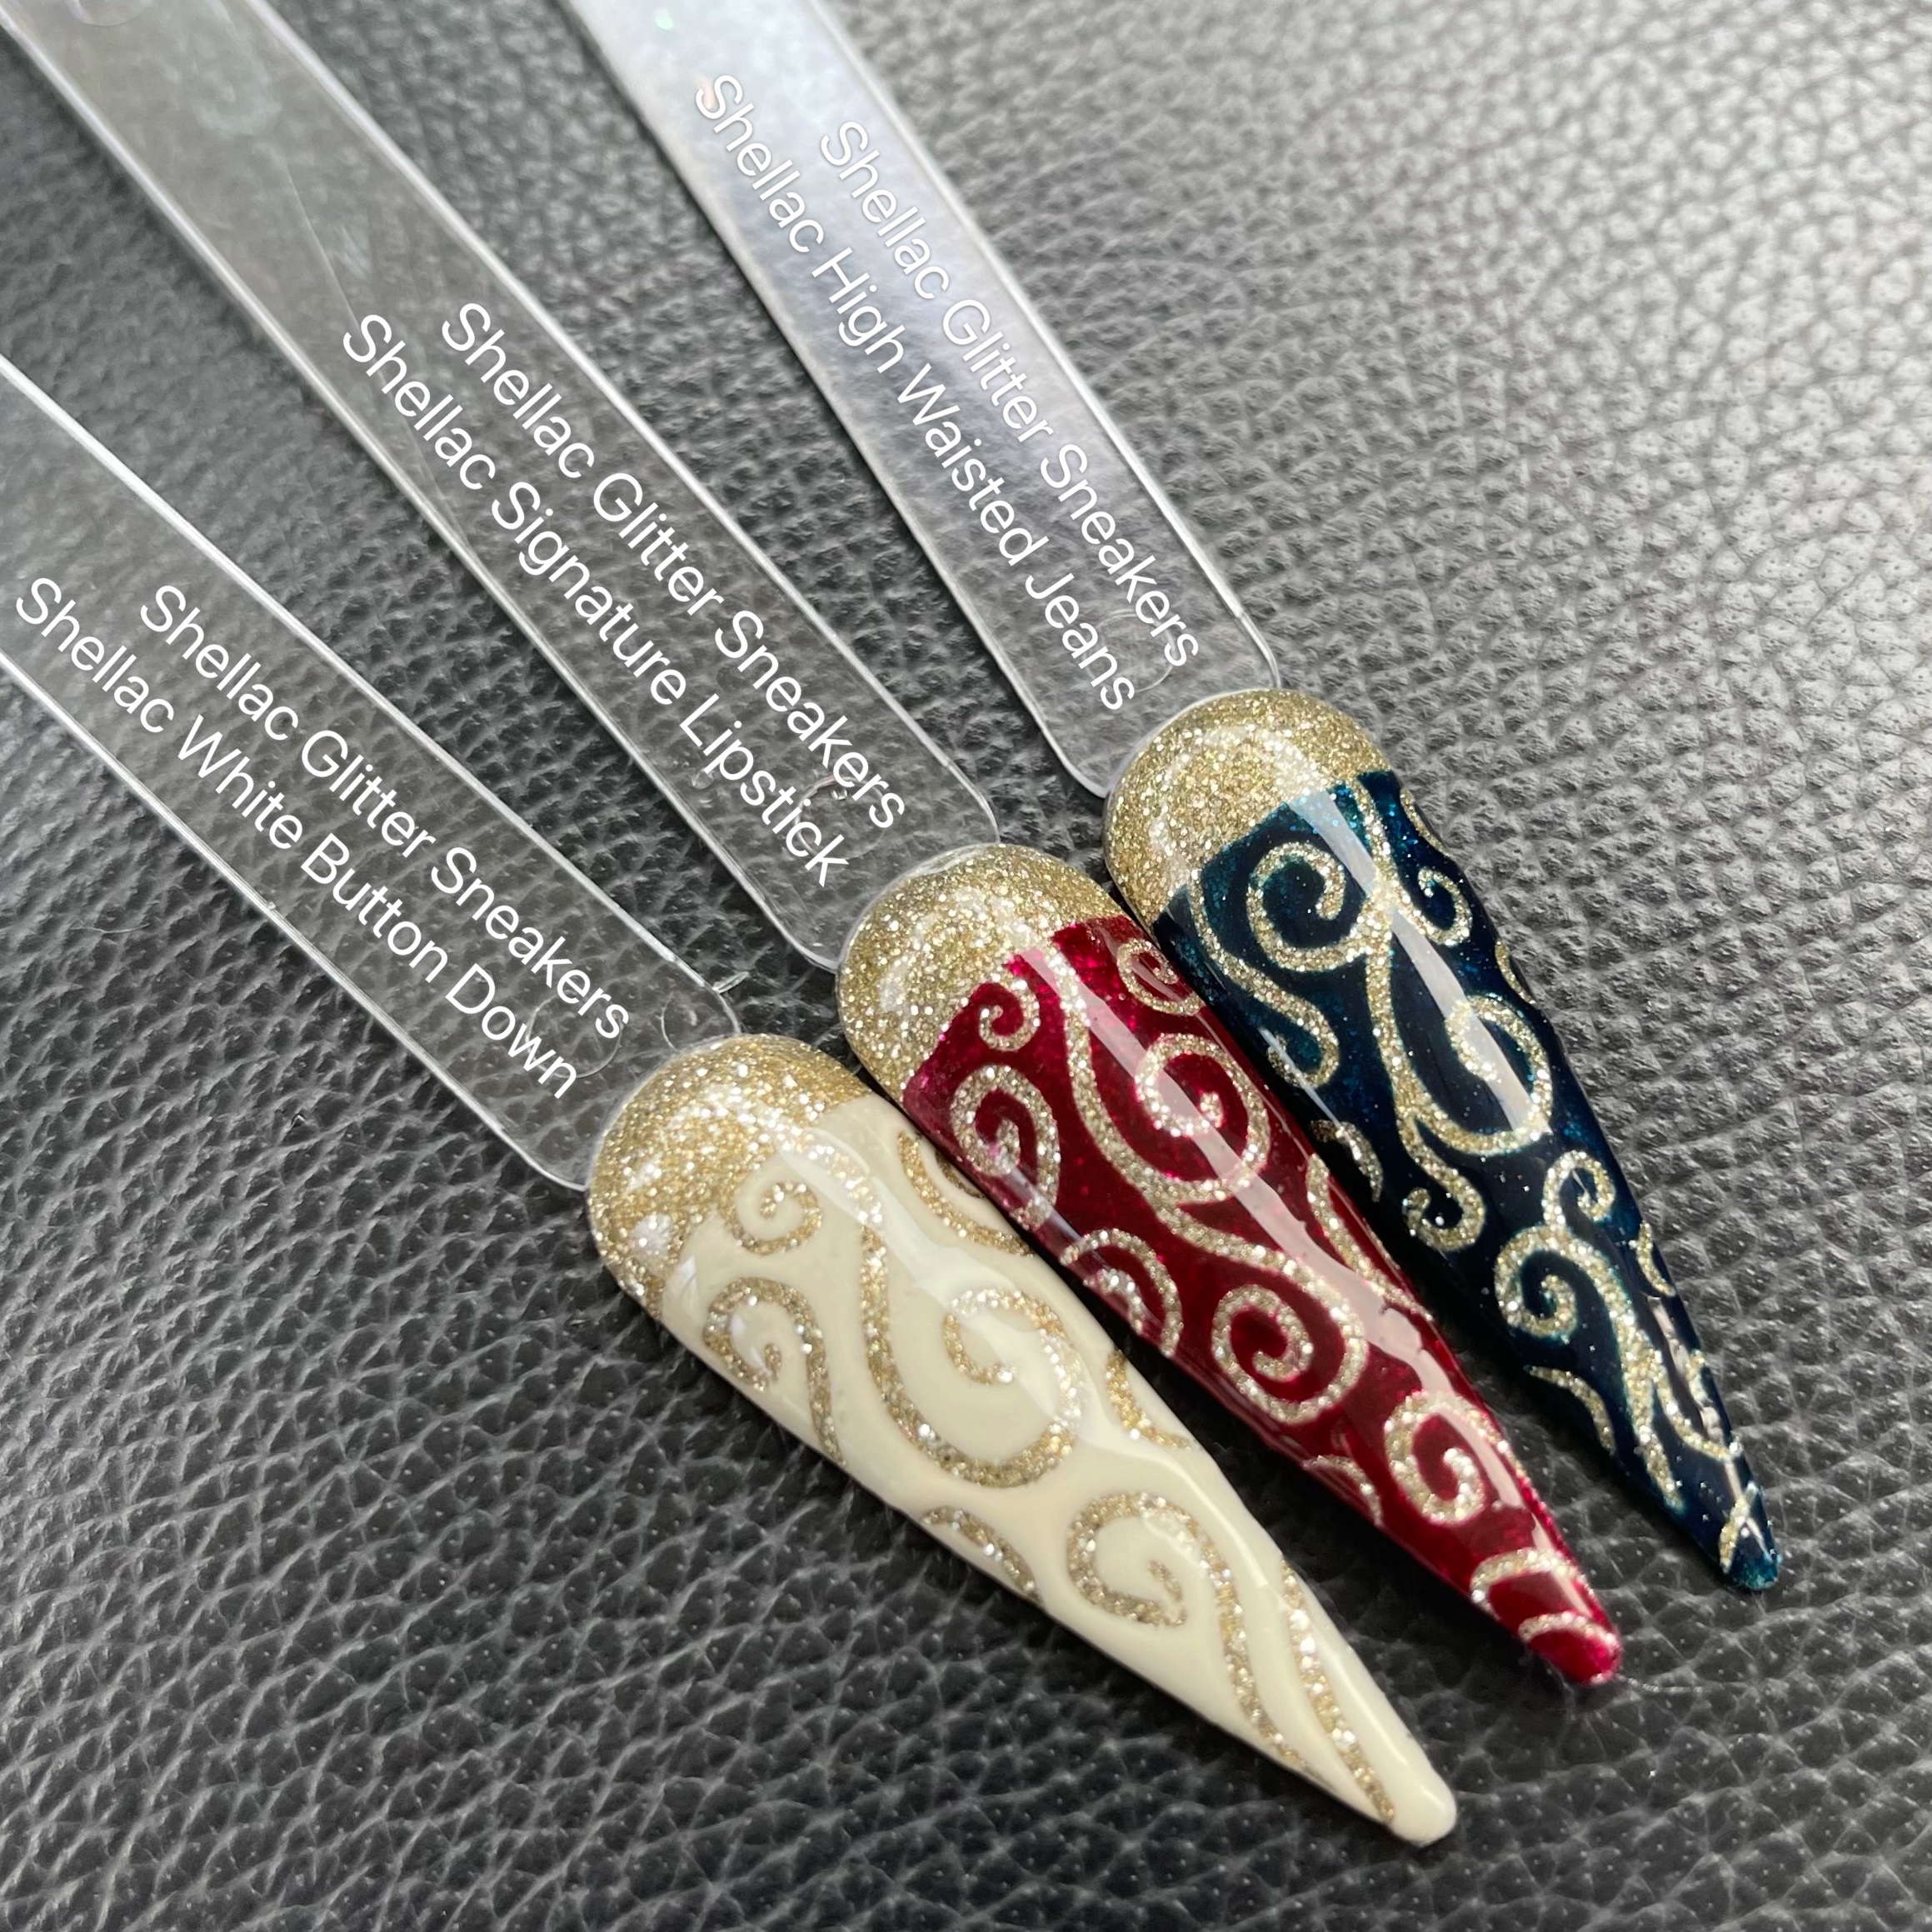
Another fun festive look is what we sometimes refer to as a ‘peekaboo’ design. We start with a layer of sparkly glitter gel polish, and then apply a dark, opaque colour on top. Then, before curing, carve through the uncured colour to reveal a glitter design. Not only does this look fab, but it’s so much quicker and easier than attempting to hand paint glitter detail over a colour. Again, we can comfortable add this design to a standard gel polish service in no more than 10-15 minutes extra.
The new CND™ Shellac™ colour collection, PARTY READY, has the absolute perfect colours for creating this kind of design. As a gold glitter base, I’ve used Glitter Sneakers, and on top, both Signature Lipstick and High Waisted Jeans look fabulous and festive. Very dramatic and sumptuous! I think it also works well with White Button Down.
Step 1
Apply and cure two layers of Shellac™ Glitter Sneakers.
Step 2
Apply a super thin layer of colour to the cured Glitter Sneakers. You could cover the entire nail surface in colour, or leave a cuff, or section, free of colour for a different look. DO NOT cure the colour yet.
Step 3
I recommend giving the colour layer a minute or two to air dry a little. It won’t be cured till it goes in the lamp, but allowing some of the solvents to evaporate will make the carving go more smoothly. With a clean dotting tool, carve your design into the uncured colour layer. Clean your dotting tool regularly as you work. You might find you have to go back over a bit here and there, that’s perfectly fine. You can carve curls and swirls for a baroque brocade, or geometric lines for a more art deco style.
If you want to carve out larger areas, try using a gel brush or detailer brush, instead of a dotting tool.
Step 4
When you are happy with your carved design, cure and finish the nail with your chosen Top Coat.

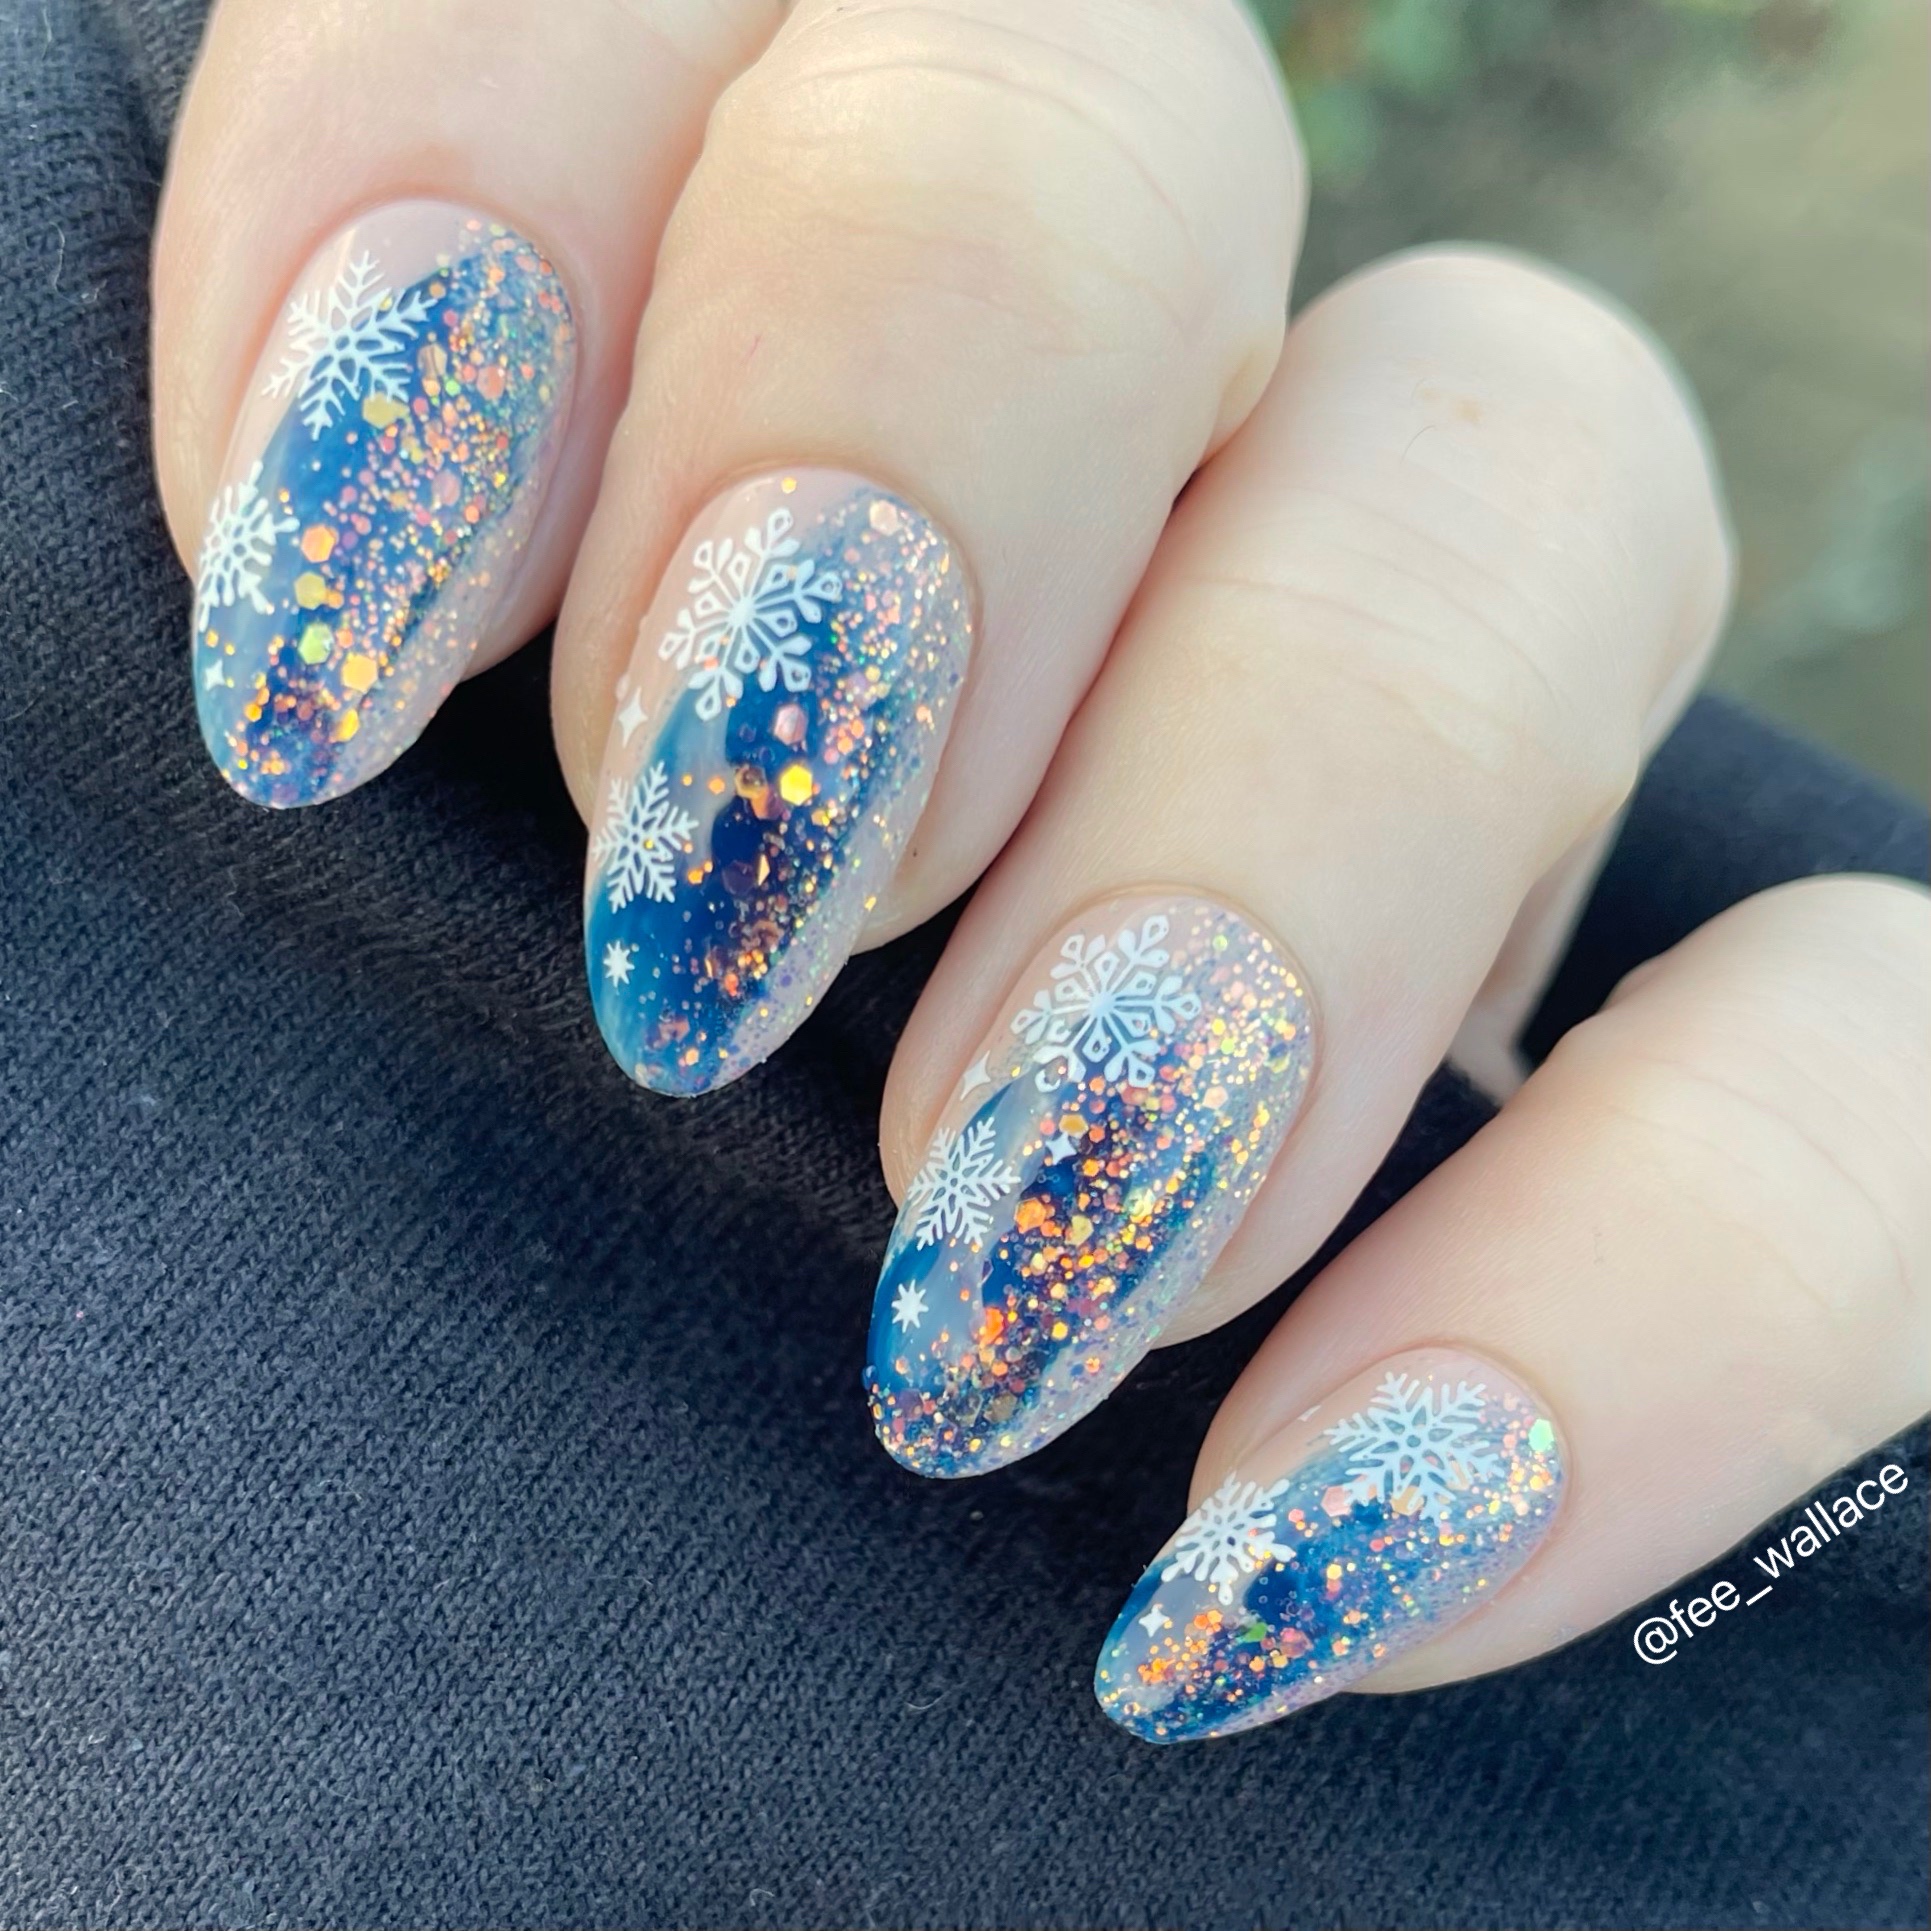
The third look I’d like to share, is a simple one I created this year incorporating a bit of glitter and some stamping. I think it almost looks as if the sparkling snow is falling as the nails move around. Very cool effect indeed!
Step 1
Apply and cure Shellac™ Silk Slip Dress.
Step 2
Apply and cure a swipe of Shellac™ High Waisted Jeans using a gel brush. This shouldn’t be too perfect or symmetrical, we are going for an abstract swoosh of colour.
Step 3
Take a small amount of Lecenté Golden White Iridescent Glitter on a dry Lecenté G1 Brush, and apply down one side of the nail only. Take care to brush away excess and make sure the glitter pieces are sitting flat to the nail. Finish this with a thin layer of Top Coat and cure. As we will go on to apply a further layer of top coat, I recommend going with the thinnest option, Shellac™XPRESS5™ Top Coat.
Step 4
Now we will stamp on a couple of little snowflakes to the opposite side from where we laid down the glitter. I used the :YOURS Loves Nataliya Winter Wonderland Stamping Plate. Please refer back to steps 3 and 4 of the first design in this blog, for detailed stamping instructions.
Step 5
Finish with the CND™ Top Coat best suited to your client’s needs.
Charging for Nail Art
My advice for deciding what to charge is based on working out what you charge on average currently for 1 minute of your time, then total it accordingly.
Calculate - service price divided by service time, and you get your total.
For example, if Sarah charges £45 for a 90 minute enhancement service, the sum would be £45 divided by 90 minutes, which equals 50p per minute. If it then takes Sarah 15 extra minutes to do the nail art, that’s £0.50 x 15, which equals £7.50.
Of course you can round this up and down accordingly, depending on your current pricing structure and timings, but this is a good place to start.
Tune In Tuesdays

Thanks so much for checking out this blog. I hope you have found the information and step-by-steps interesting and helpful. If you have any questions please come find me on social media, and if you try out any of the designs for yourself I would love to see them and hear how you got on and what your clients thought.
If you enjoyed this blog, why not join me each Tuesday at 1pm for my weekly, interactive online show – Tune in Tuesdays. We broadcast on Sweet Squared’s amazing new education platform, Academy2. Find us there under ‘MasterClasses’. Register onto the next session HERE.
You can watch the show live, or get a link to a recorded version on catch up, and have access the notes and handouts I prepare each week to support the episodes. It’s free to take part, but you must register in advance, the recording is only available to those who register before the broadcasts commences.
Have a great festive season!
Fee xxx

Fee on Facebook - https://www.facebook.com/fee.wallace
Fee on Instagram - https://www.instagram.com/fee_wallace
Fee on YouTube - https://www.youtube.com/feewallace
Fee on TikTok - https://www.tiktok.com/@fee_wallace
Fee’s own blog - https://feewallace.com