LAST-MINUTE CHRISTMAS NAIL ART STEP-BY-STEPS
Posted by Fee Wallace on 15th Dec 2021
In the last Episode of Tune In Tuesday of 2021, I shared 5 Xmas nail art designs step by step. If you joined us live, thank you so much for your support. In this blog you’ll find the written step-by-steps for the design we created, plus the products and tools used to achieve each of the different looks.
Tune in Tuesday is a live online masterclass for Nail Professionals created and hosted by me, Fee Wallace. The show goes out every other Tuesday and we cover topics from nail art, to enhancement techniques, plus business building tools, advice for working with clients, and lots more. Always created for, and relevant to those working in the professional nail industry.
Look 1 – The Xmas Bauble
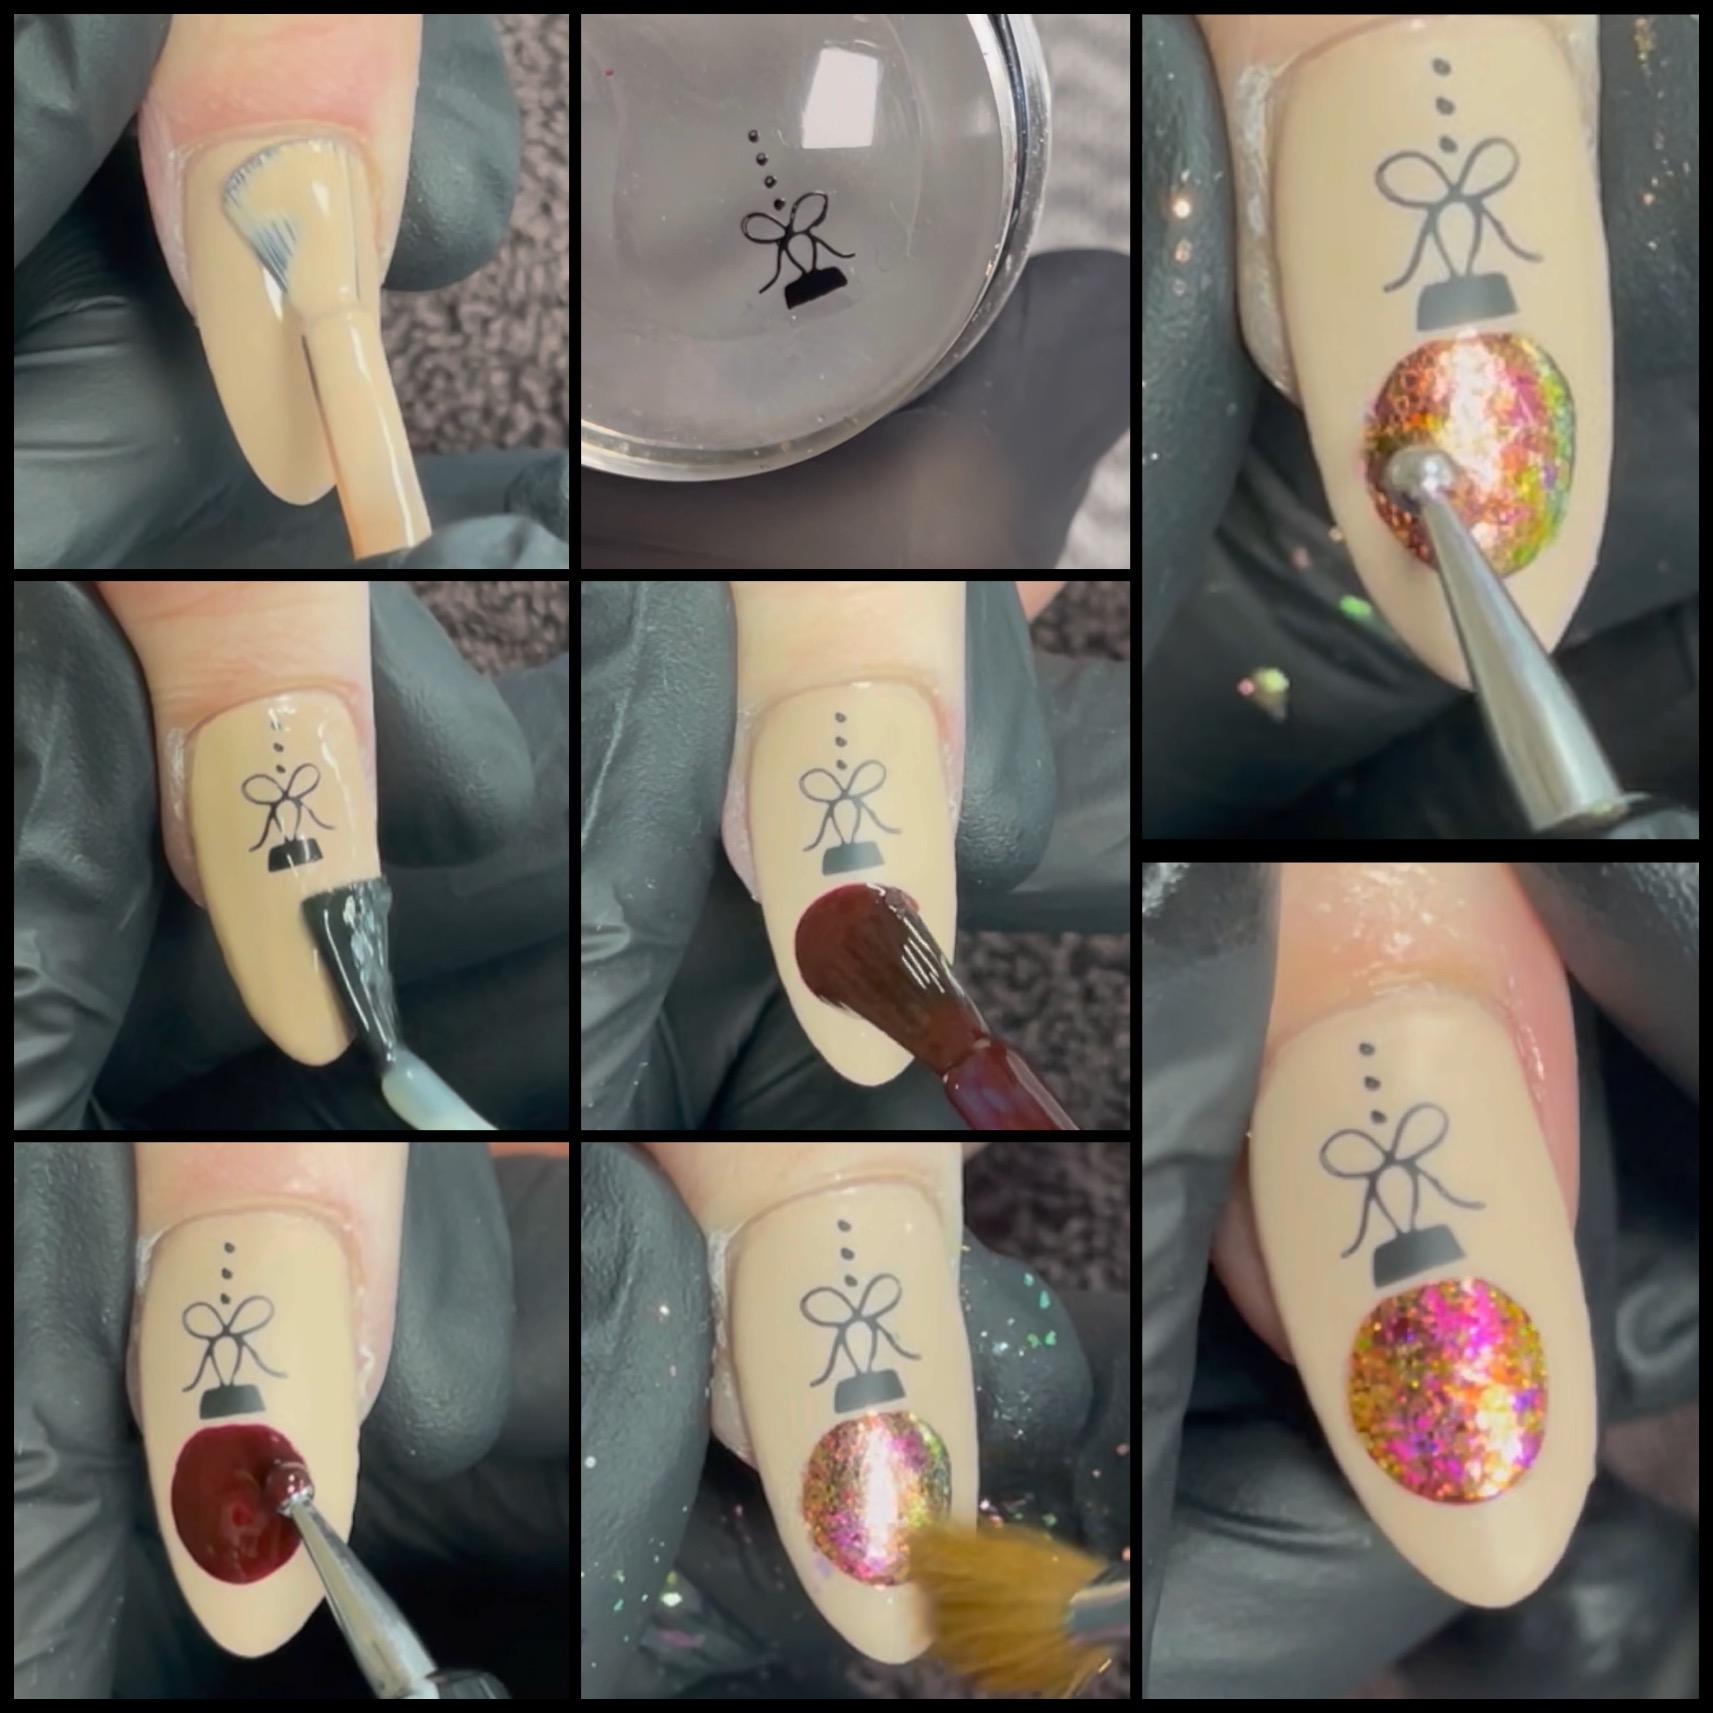
This classic Christmas nail design is so effective because the glossy sparkling design stands up off the smooth matte background. It’s quick and easy to create, and makes for a fantastic signature nail, as part of a set using different techniques.
You can easily adapt this design by using different colours, glitter and foil, or changing the shape of the bauble. It looks great as a little lantern/teardrop shape too. The products I used for this version are as follows:
- Shellac™ Silk Slip Dress
- Shellac™ Matte Top Coat
- Shellac™ Signature Lipstick
- :YOURS Stamping Polish Black Out
- :YOURS Loves Sascha Stamping Plate: Merry Stamping
- :YOURS Halo Stamper
- Lecenté Pure Pink Nail art Foil
- Lecenté Chantilly Iridescent Glitter
- Lecenté Blush Pink Iridescent Flakes
- Dotting Tool
Step 1 – Apply and cure two layers of your chosen base colour. I think a nude works really well as a background for this design.
Step 2 – Stamp on the little pattern that will make the top of the Xmas bauble. There is a perfect stamp for this on the plate I mentioned in the list above. Alternatively, hand paint this element with a detailer brush. For more detailed steps for stamping, click here to check out our stamping surgery blog.
Step 3 – Apply and cure CND™ Shellac™ Matte Top Coat. Remove top film after curing.
Step 4 – With the brush out the bottle, apply a rough circle of Shellac colour as the base of your bauble. Make the circle a little smaller than you want it in the end, we will go on to perfect the size and shape in the next step. I have found that deep dark colours work especially well for this. Shellac Signature Lipstick was a great choice.
Step 5 – Use a dotting tool to perfect the shape and size of the bauble. You will find the uncured Shellac™ colour moves easily where we need it to go when we use a light scribbling motion with the dotting tool. Remember, there is a cured layer of Matte Top Coat below, so if the bauble isn’t working out, you can easily wipe it off and start again. Cure the bauble once you are happy with it.
Step 6 – Now we can adhere our nail art embellishments to the cured Shellac™ colour. Tap on a little foil, add some glitter, and finish by packing on the iridescent flakes. You can try all sorts of combinations here, you can’t go far wrong.
Step 7 – Apply a blob of Top Coat to the centre of the decorated bauble, and again use a dotting tool to move the top coat out so it covers the bauble right to the edges. Once your bauble is top coated, cure.
Look 2 – Easy Glitter Holly
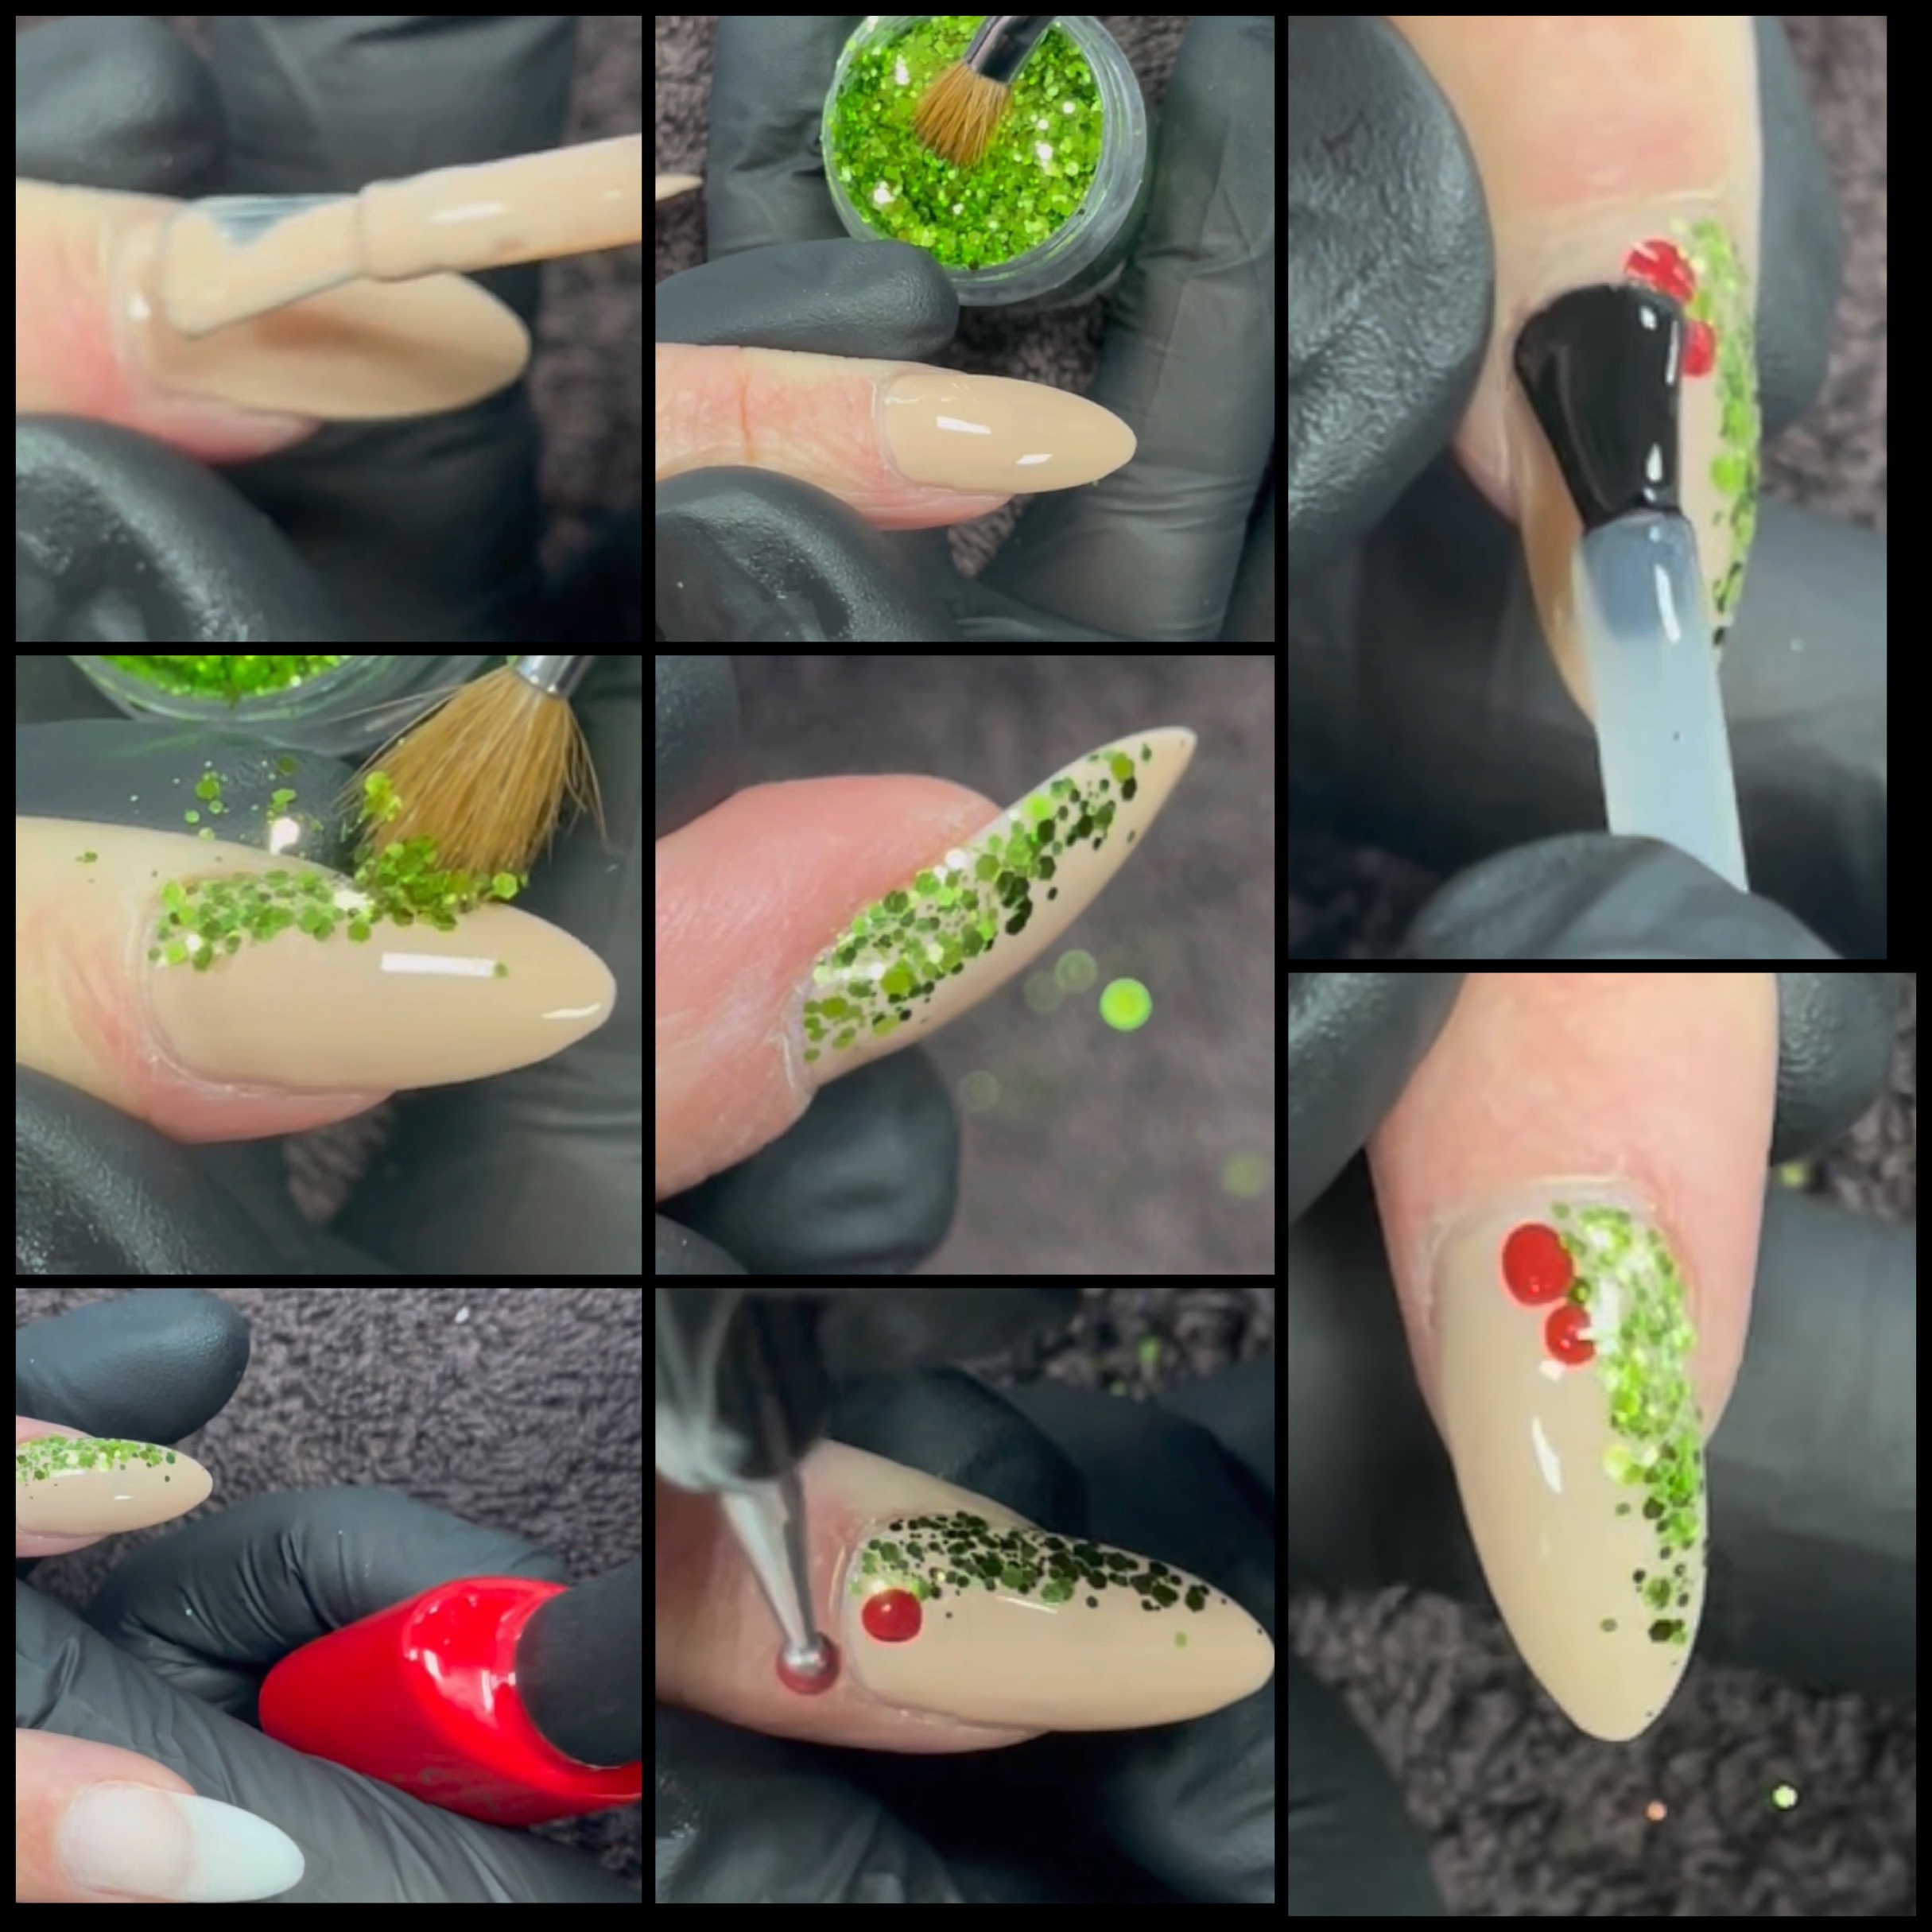
This quick design is perfect for clients looking for a little Xmas accent nail. It works great over almost any background, and your client will be thrilled with how simple and fun it is. To create this design, I used the following products:
- Shellac™ Silk Slip Dress
- Lecenté Lime Green Multi-Glitz Glitter
- Lecenté G1 Brush
- Shellac™ Company Red
- Dotting Tool
Step 1 – Apply and cure two layers of your chosen base colour. Here I have used my favourite nude, Shellac™ Silk Slip Dress.
Step 2 – with the dry G1 Brush, apply a small amount of glitter down one side of the nail in a rough diagonal. The glitter will adhere beautifully to the top film of the cured Shellac colour layer. Make sure the glitter pieces are lying flat to the nail and no stray bit are poking out at the sidewall.
Step 3 – Add a little holly berry or two using a red Shellac™ and a dotting tool, then cure.
Step 4 – Finish with the Shellac Top Coat of your choice.
Look 3 – Frozen Snowscape
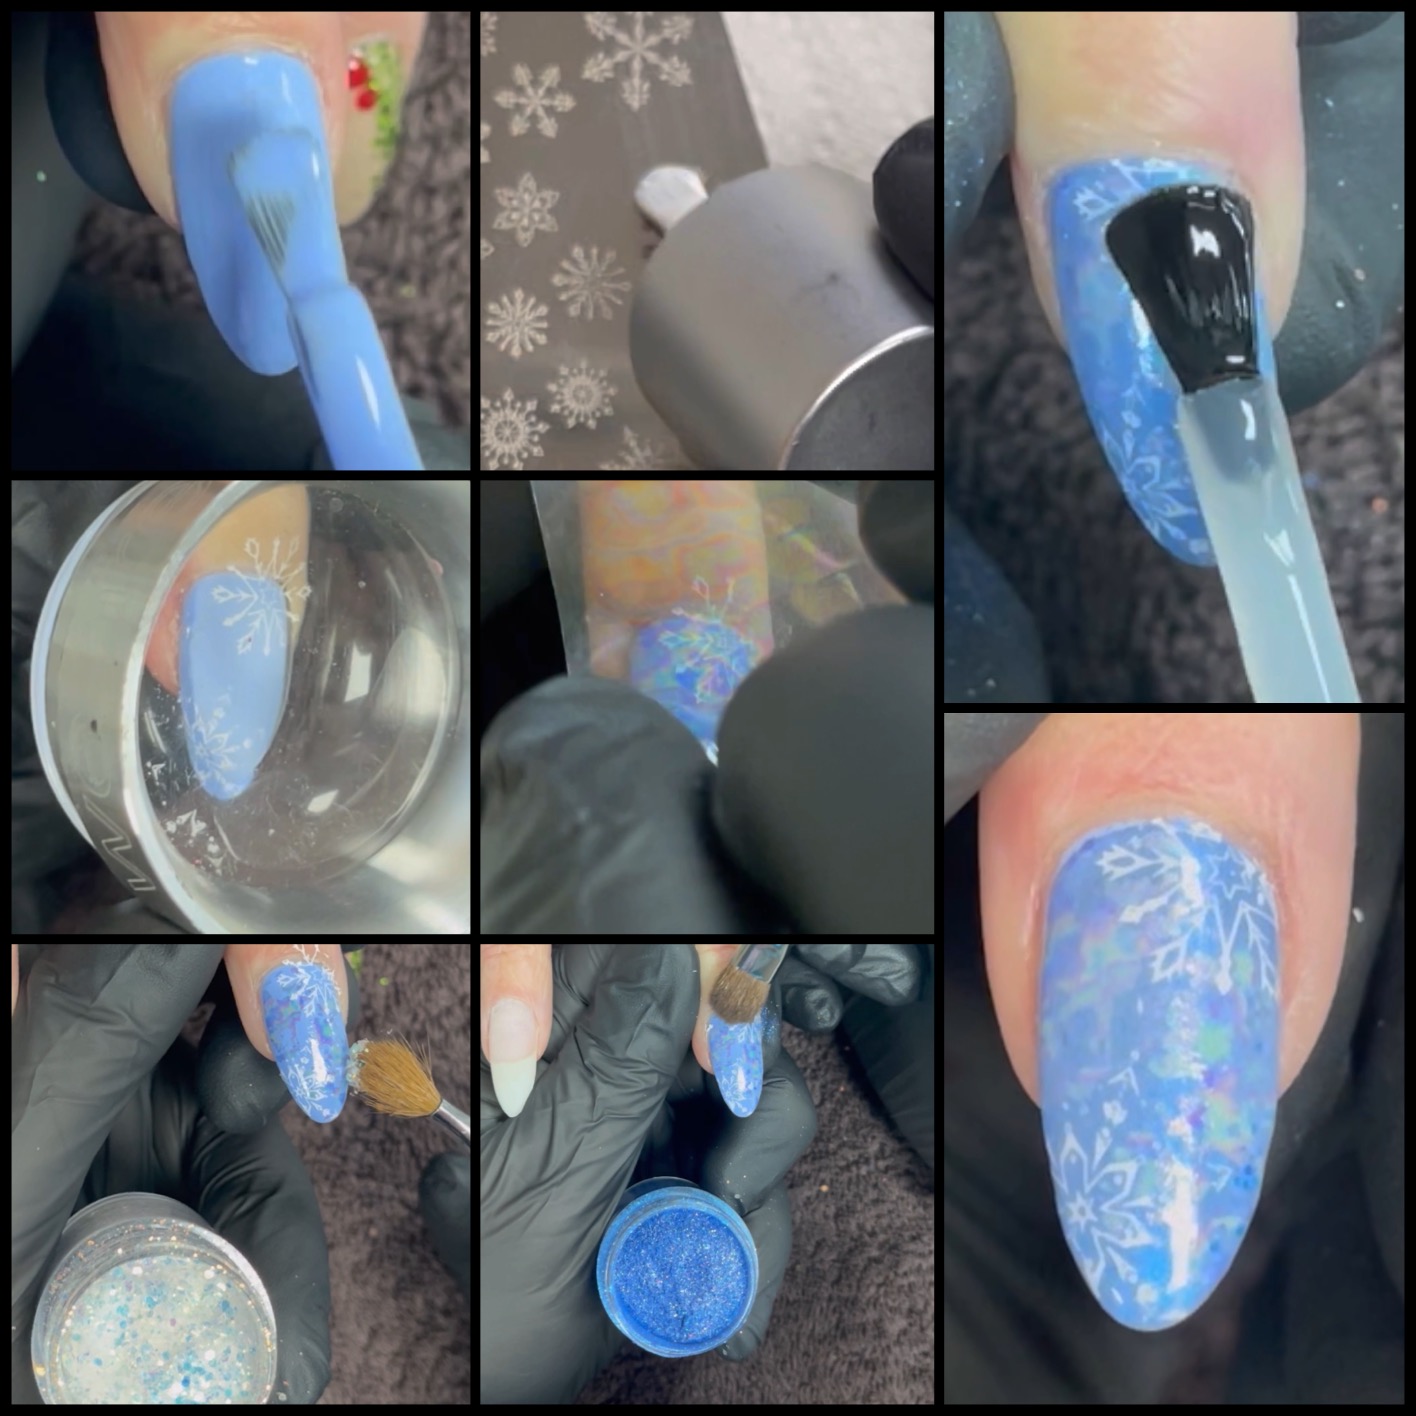
This look has become a real classic, shimmering ice and snow on crisp blue tones. This one is beautiful and simple to do. I used the following products for the version of the design I created here:
- Shellac™ Chance Taker
- :YOURS Stamping Polish White Light
- :YOURS Loves John Stamping Plate: Winter Knits
- :YOURS Halo Stamper
- Lecenté Clearly Oil Slick Foil
- Lecenté Golden White Iridescent Multi-Glitz Glitter
- Lecenté Rapture Glimenté Glitter Dust
- Lecenté P1 Brush
Step 1 – Begin with two cured layers of a mid to light blue gel polish. I chose Shellac™ Chance Taker, but have also used Down by the Bae for this kind of design.
Step 2 – Using white stamping polish, stamp on part of two snowflakes, at opposite corners of the nail.
Step 3 – Press on some Clearly Oil Slick Foil, remember to tap it on matte side down to get a great transfer onto the nail. We want the foil to go on in little patches, and not cover over everything. It will stick to the cured Shellac colour layer and not to the stamped on snowflakes.
Step 4 – Add just a little Golden White Iridescent Glitter with a dry G1 Brush.
Step 5 – Our final embellishment is some Glimenté Glitter Dust. I find the Lecenté P1 Brush is ideal for applying this kind of product. I rubbed on a small amount, all over the nail, this adds further dimension to the finished design.
Step 6 – Finish with the Top Coat or your choice and cure.
Look 4 – Foil Holly Wreaths
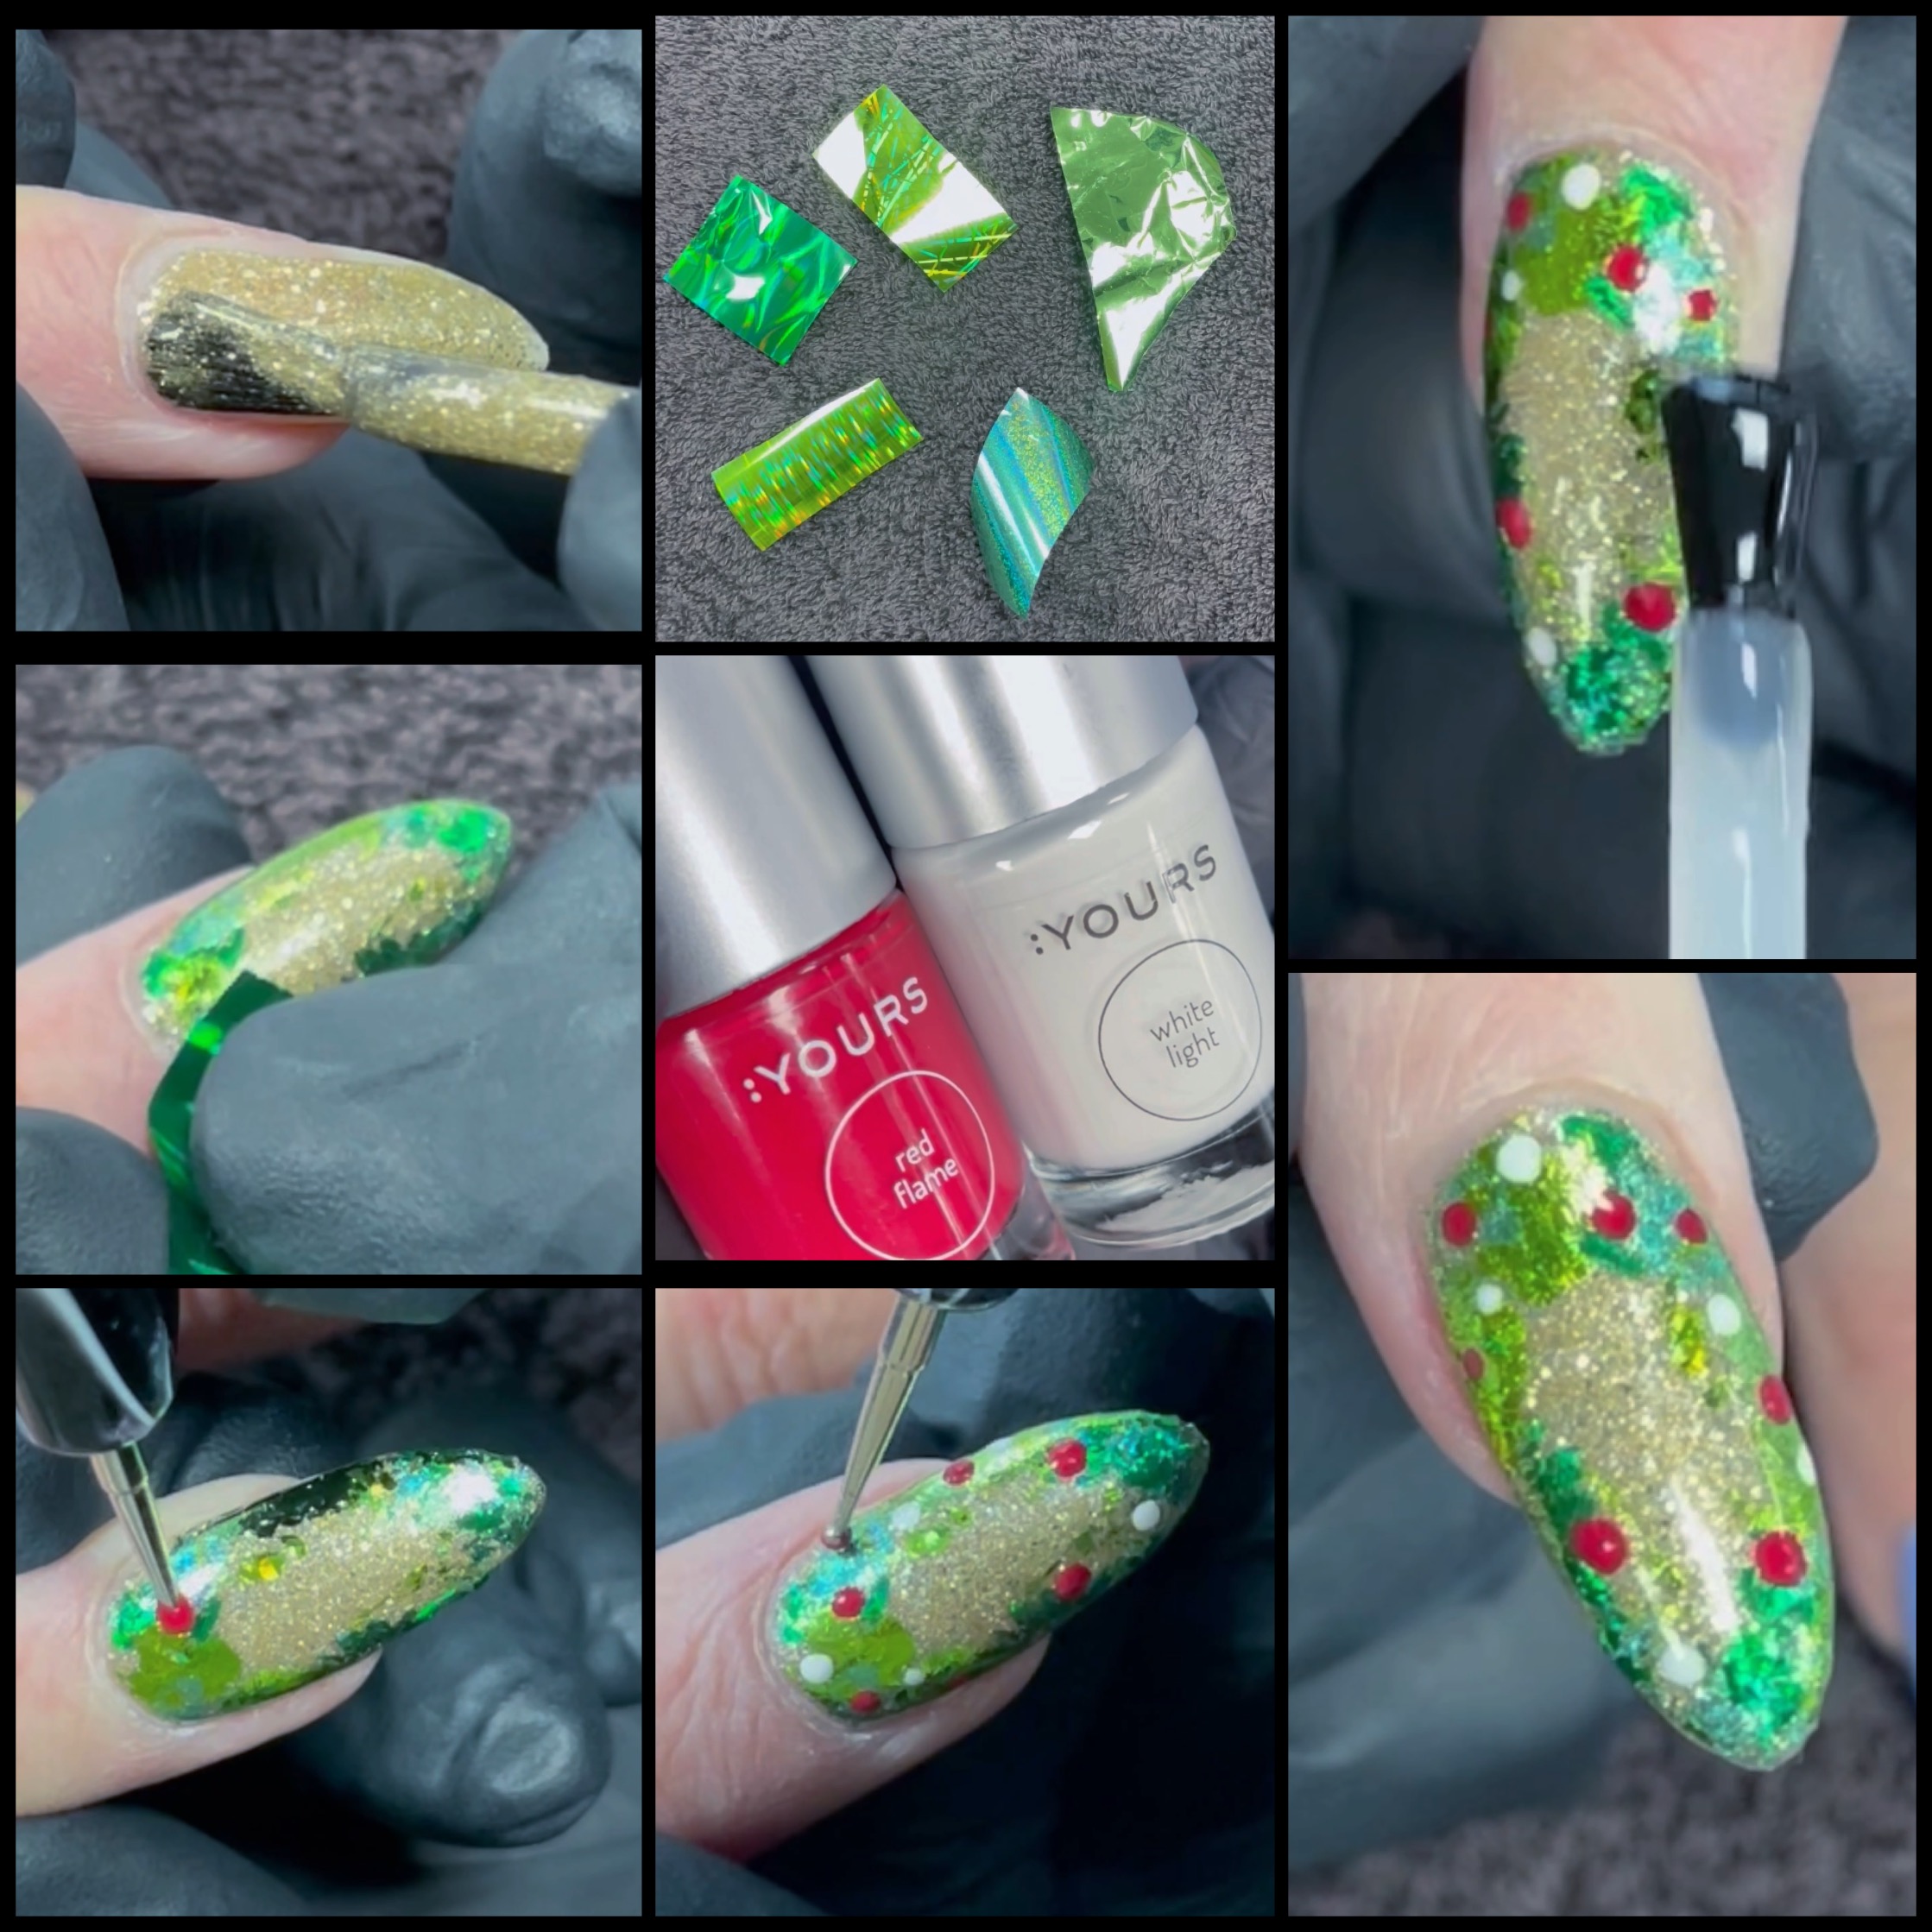
This design has gotten so much attention over the last couple of weeks. The technique is so effective, and looks awesome over just about any background colour. Here are the specific products I used for this version of the design:
- Shellac™ Glitter Sneakers
- Selection of Green Lecenté Foils: Pine Shimmer, Lime Green Holographic Lines, Lime, Lime Spangle, Rainbow Shimmer.
- :YOURS Stamping Polishes Red Flame & White Light
- Dotting Tool
Step 1 - Apply and cure two layer of your chosen base colour. I love Shellac™ Glitter Sneakers for this design. It’s such a sparkly, cool, sandy gold, and it’s completely opaque in two thin layers.
Step 2 – Cut yourself little stamp sized pieces of foil and begin applying around the edges of the nail. The foil will adhere well to the cured Shellac colour. Build up the leaves of your wreath bit by bit, creating a frame around each nail.
Step 3 – Next, add red holly and white mistletoe berries. I did it with stamping polish and a dotting tool.
Step 4 – Finish with the Shellac™ Top Coat of your choice.
Look 5 – Christmas Carnival
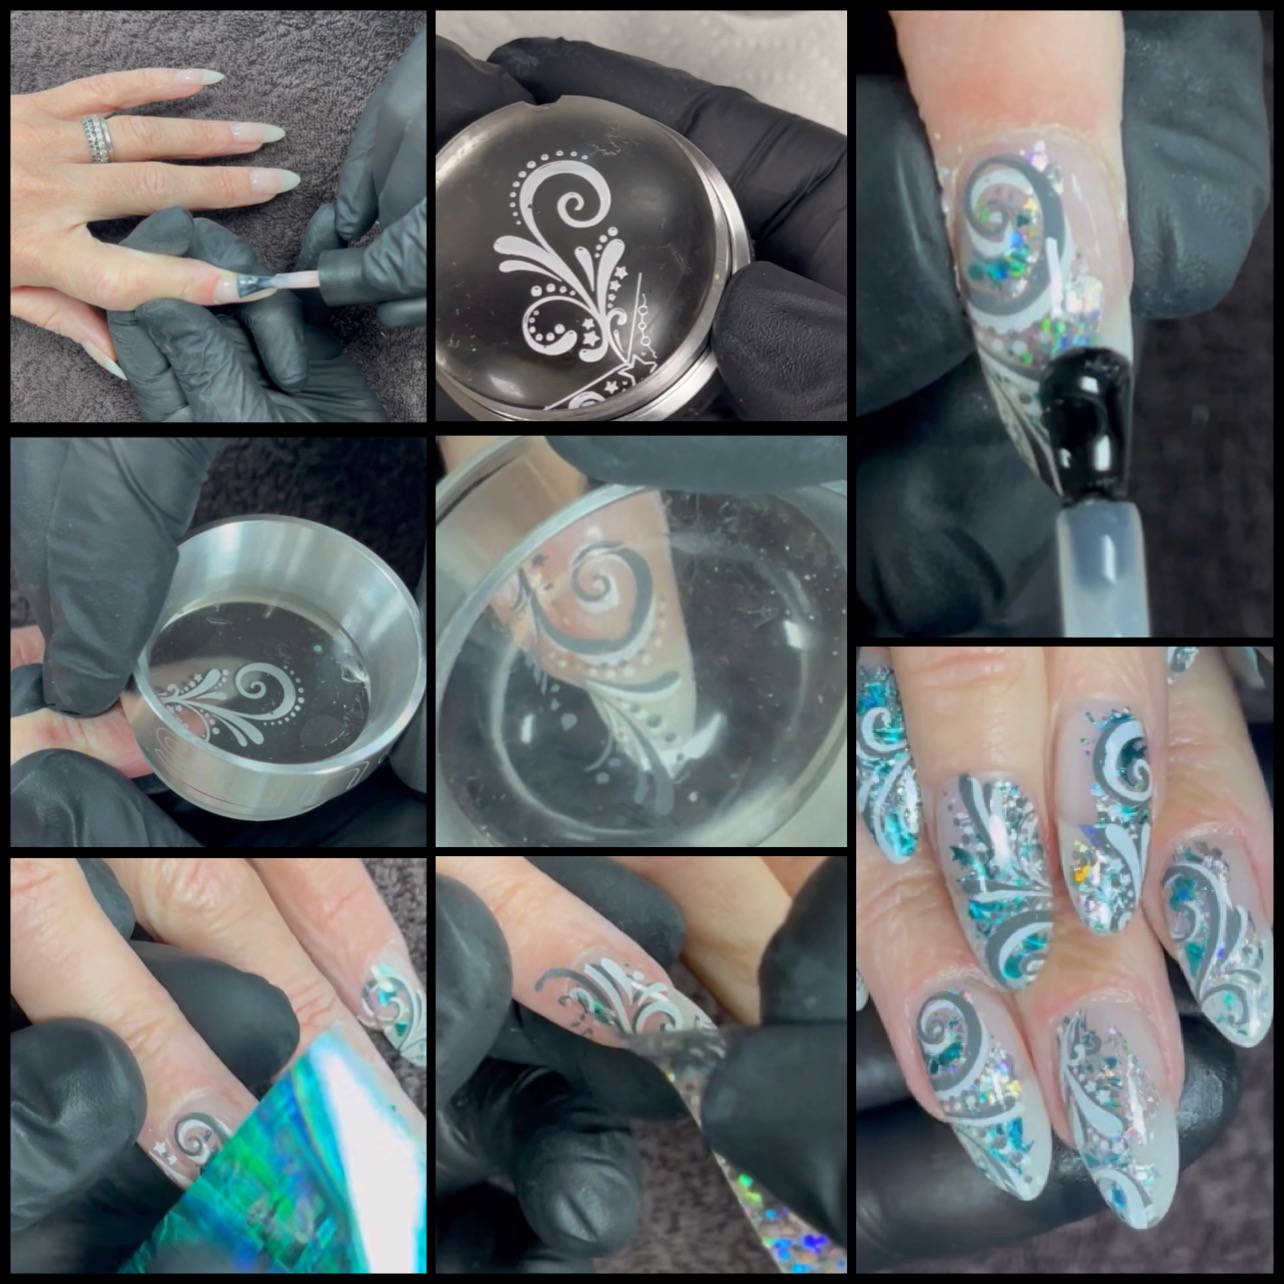
This has been by far my most favourite design this season. I created it for one of my very best clients and we both absolutely loved it. I hope you do too! For this look we will be double stamping on all ten nails, so be sure to allow yourself an extra minute per nail into your service time. Working out what to charge for your time when creating nail art can be tricky. If you would like some advice click here to read the Festive Nail Art blog from earlier this month with tips from me on how to charge for your nail art services.
- CND™ Shellac Beau
- :YOURS Stamping Polish Grey Day
- :YOURS Stamping Polish White Light
- :YOURS Loves Dee Stamping Plate: Winterful
- :YOURS Halo Stamper x2
- Lecenté Foil Turquoise Waves
- Lecenté Foil Silver Holographic
Step 1 – Apply and cure a nude or natural French pink on all ten nails. A applied this design over a set of natural looking nail enhancements, so one thin layer of French pink was all needed. Use a nude such as Cashmere Wrap or Baby Smile if the nails in front of you require more coverage.
Step 2 – Having two Halo stampers will make this step easier, but of course it can still all be done with just one stamper. Pick up part of the design on one stamper using Grey Day Stamping Polish, then pick up the exact same part of the design on your 2nd stamper, using White Light Stamping Polish. Land the grey design down one side of the nail, now land the white design not exactly on top, but just down and off to one side ever so slightly. This will give you the appearance of a ‘drop shadow’, making the design really stand up off the nail. It’s a really cool effect. Repeat this for all ten nails. I chose to apply the colours turn about, nail by nail, i.e. on the pinkie it was grey first then white on top, on the ring finger white first with grey on top, on the middle finger again grey first with white on top, etc.
Step 3 – Once the stamping is complete, take two foils of your choice. I went with Turquoise Waves and Silver Holographic as they were super sparkly and great wintery colours. Tap the foils on, in and around the stamped on design, concentrating on the offside of the nails. The foil will stick to the cured Shellac in the background, but not to the dry, stamped on polish.
Step 4 – Finish with the top coat of your choice.
Thank you so much for checking out the blog! I hope you enjoyed it the designs and found some festive inspiration. I would love to hear what you think, and if you try any of the designs I would be so thrilled if you tag me in your photos.
Hope you and your clients have an awesome festive season.
See you in the new year!
Fee xx
Fee on Facebook - https://www.facebook.com/fee.wallace
Fee on Instagram - https://www.instagram.com/fee_wallace
Fee on YouTube - https://www.youtube.com/feewallace
Fee on TikTok - https://www.tiktok.com/@fee_wallace
Fee’s own blog - https://feewallace.com/